Tiki Central / Other Crafts
BeezleBug Mugs (Pg. 14: Paintings)
|
B

BeezleBug
Posted
posted
on
Sun, Jul 15, 2012 9:42 AM
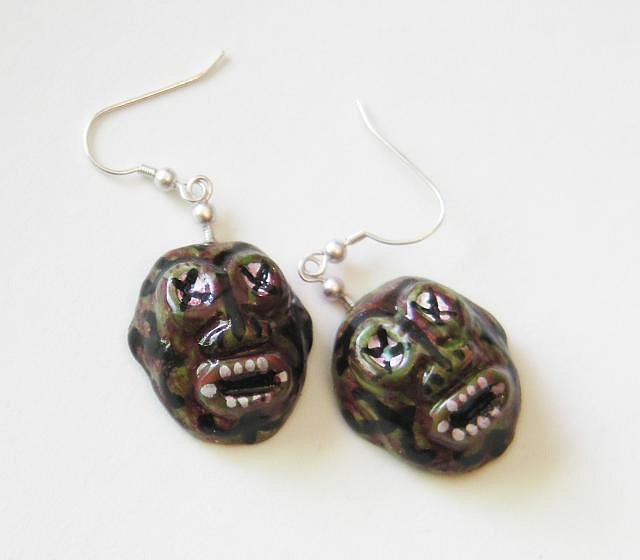
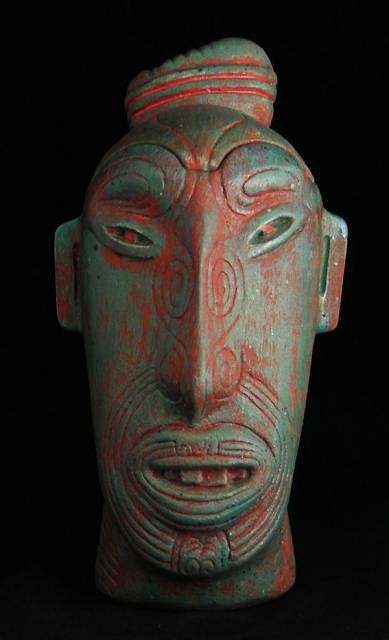
Another slip-cast adventure - slip-cast earrings. Here's a series that is a zombified, shrunken-head version of a Marquesas mask:
[ Edited by: 2012-07-19 16:47 ] |
|
B
BeezleBug
Posted
posted
on
Thu, Jul 19, 2012 4:56 PM
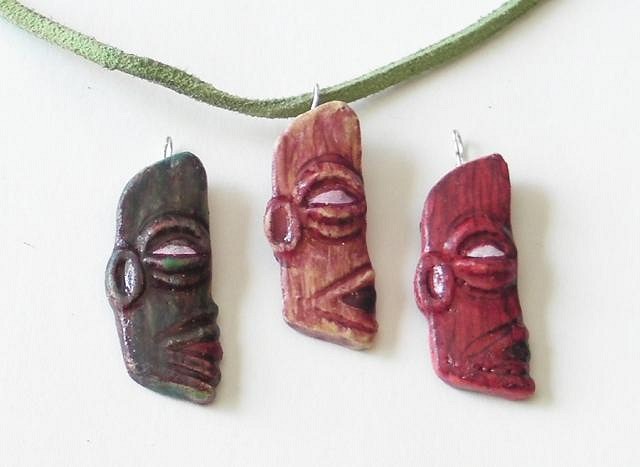
Some slip-cast pendants, based on a Rarotongan staff god carving:
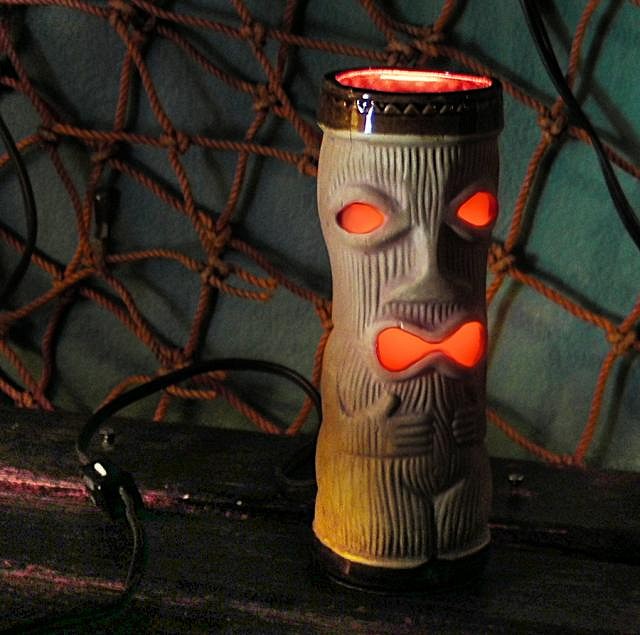
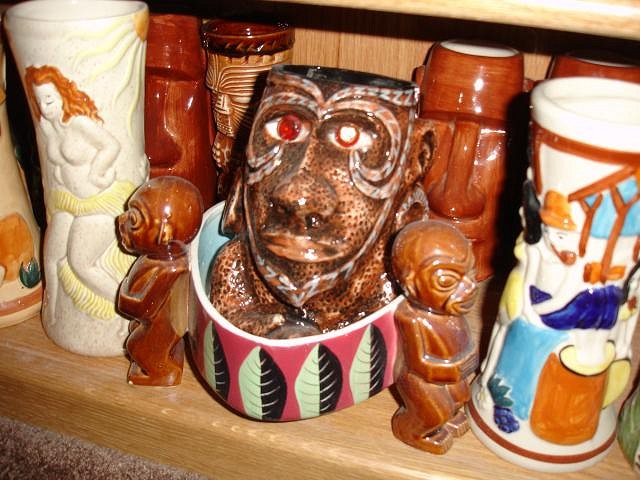
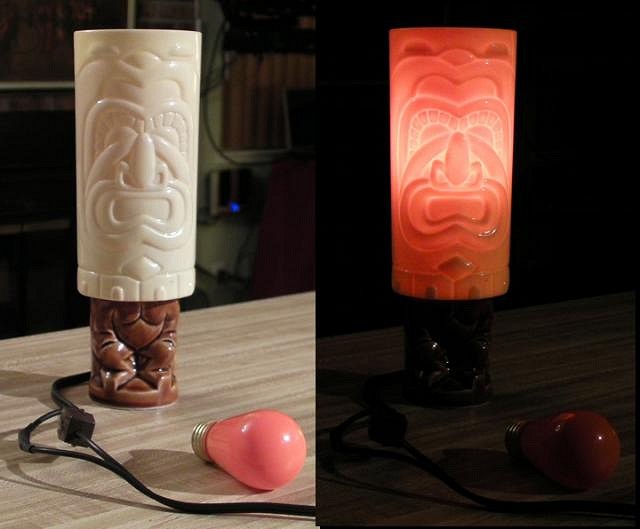
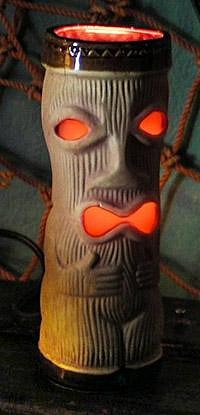
And this crazy thing - a tiki mig night light, made out a vintage PMP peanut mug and some lamp parts.
The night light was fun to make (although cutting thes holes was an interesting challenge). Think I'll make a few more out of some of the not-so-rare mugs in my collection. [ Edited by: BeezleBug 2012-07-19 16:57 ] |
|
B
BeezleBug
Posted
posted
on
Mon, Jul 23, 2012 10:42 AM
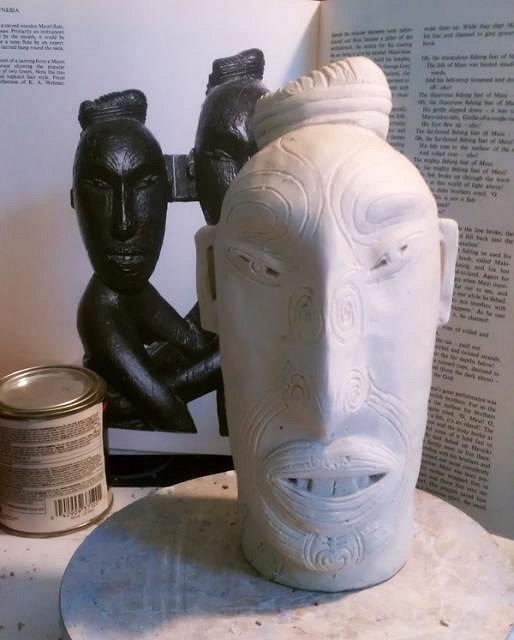
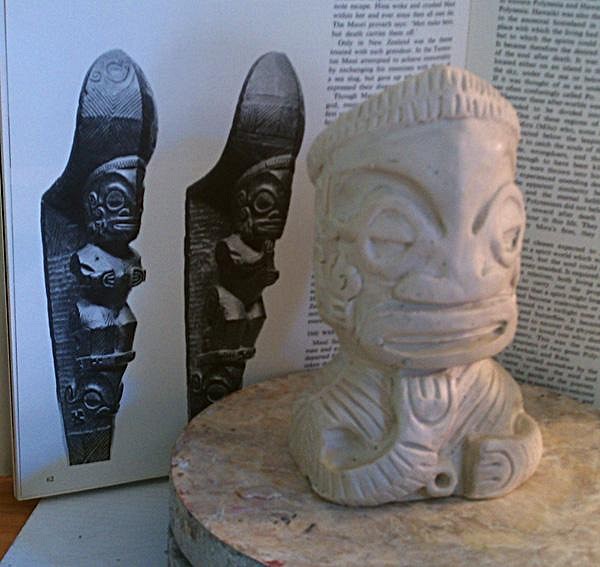
New mug in the works. This one based on a Maori "lovers" carving. Think I'll just call her "Topknot."
Once again, I'm working in Klean Klay - or, rather, Van Aken's Klean Klay Alternative since Klean Klay went out of business... |
|
BG

Bloody Good
Posted
posted
on
Mon, Jul 23, 2012 12:46 PM
All looks very nice!!! |
|
D

danlovestikis
Posted
posted
on
Wed, Jul 25, 2012 7:49 AM
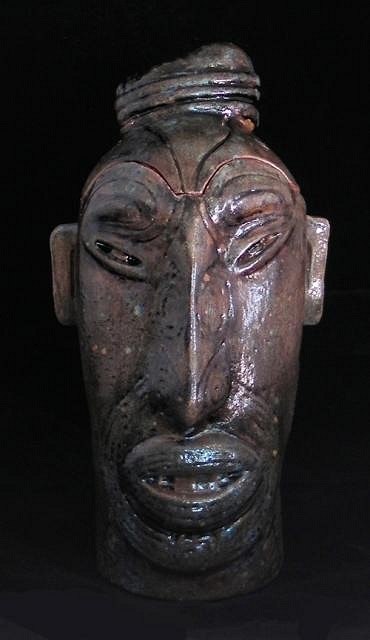
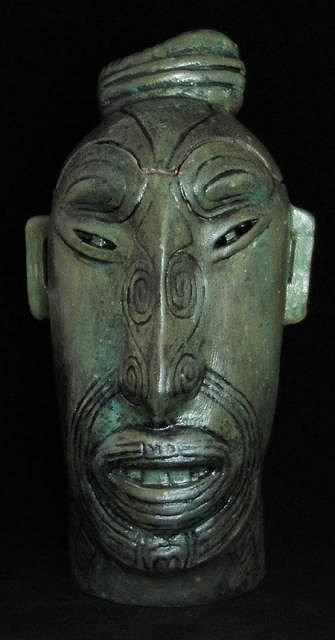
I really enjoyed looking back and forth from your sculpt to the photo in the book. Its wonderful you have brought that page to life. That is a piece of Maori art that I had never seen before and we have a stack of books. I'm glad you found it. I'll be looking forward to seeing it glazed. We had a tiki collecting friend over Monday evening and of all the tikis we have Dan showed off your Solomon Island mug. We think it is very special. It is fun to watch you work, Wendy
|
|
B
BeezleBug
Posted
posted
on
Wed, Jul 25, 2012 1:14 PM
Hi Wendy, Solomon certainly looks happy there - surrounded by Tiki friends. The book I go back to over and over is "Oceanic Mythology" by Roslyn Poignant published in '67. I find my mugs look better if I base them on specific Oceanic art (as opposed to copying pre-existing pop-Tiki designs). |
|
B
BeezleBug
Posted
posted
on
Wed, Jul 25, 2012 1:16 PM
I just noticed that Solomon is being carried in a litter like a King - ha - very cool. |
|
B
BeezleBug
Posted
posted
on
Wed, Jul 25, 2012 1:17 PM
And now for something different. Thought I'd dust off my CafePress shop and add some Tiki T-shirts for fun... Here's the first design:
|
|
B
BeezleBug
Posted
posted
on
Wed, Jul 25, 2012 9:17 PM
A little Frankenstein work on a couple of run-of-the-mill mugs...
|
|
D
danlovestikis
Posted
posted
on
Wed, Jul 25, 2012 9:34 PM
Great Shirt and Fun lamp you are on a roll, Wendy |
|
M

MadDogMike
Posted
posted
on
Wed, Jul 25, 2012 10:07 PM
Love the shirt :lol: |
|
B
BeezleBug
Posted
posted
on
Thu, Jul 26, 2012 11:54 AM
Thanks. Here's some more silliness:
|
|
BT

Badd Tiki
Posted
posted
on
Thu, Jul 26, 2012 3:17 PM
ahhhahaha, I c wut u did there |
|
B
BeezleBug
Posted
posted
on
Fri, Jul 27, 2012 1:35 PM
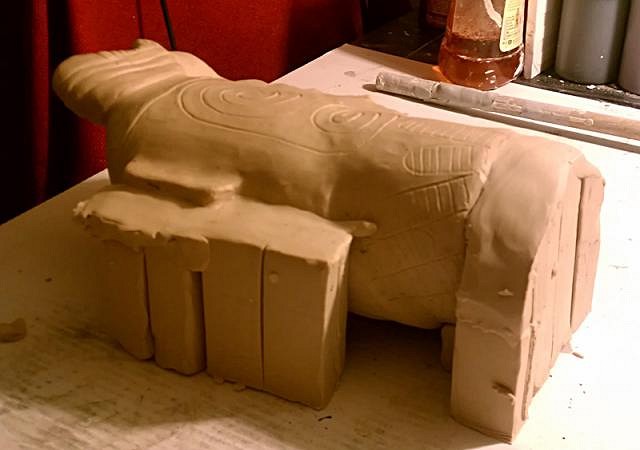
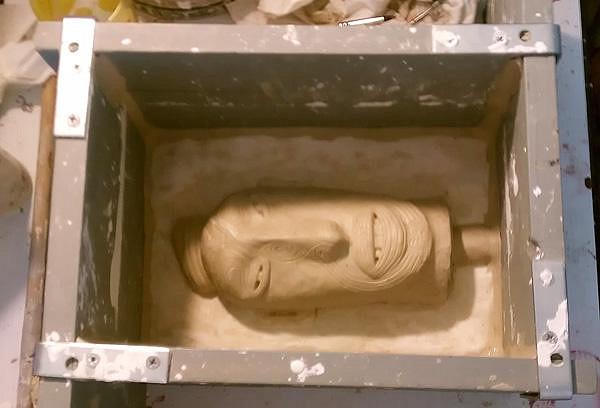
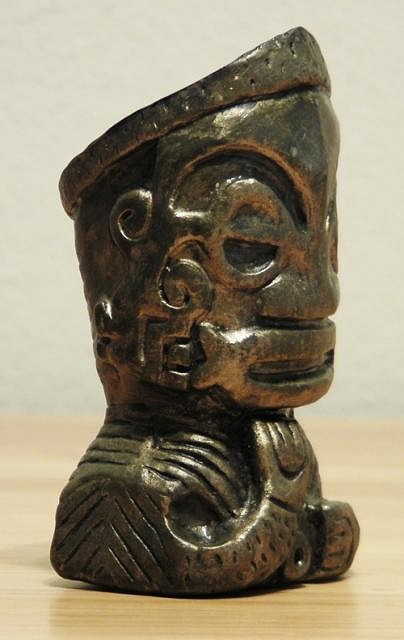
A friend was asking me about the slip casting process, so I thought I document my newest mug, Topknot, in more detail. Here's the start: I sculpted the mug in Klean Klay Alternative Medium. The Klay was built up over an empty tin can to give it some extra rigidity. Rubber-tipped clay tools were used to add detail. I smoothed the Klay with my fingers and a little Murphy's Oil Soap.
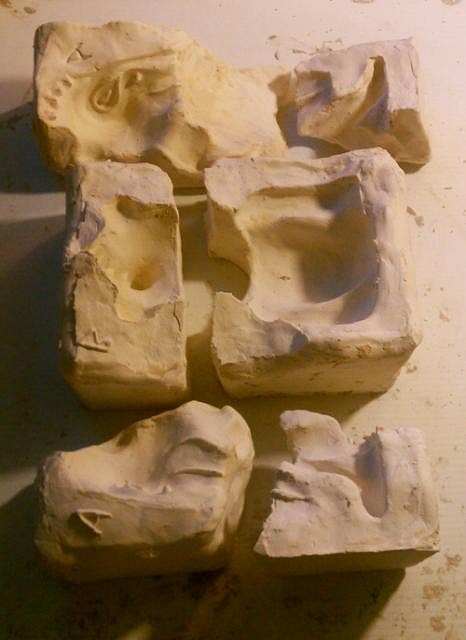
Now, time for the mold. Because the sculpt included intricate line art, I suspended the mug nose-first with short Klay pillars. The pillars join the sculpt where there was no detail. The whole thing sits on a large corrugated plastic matte.
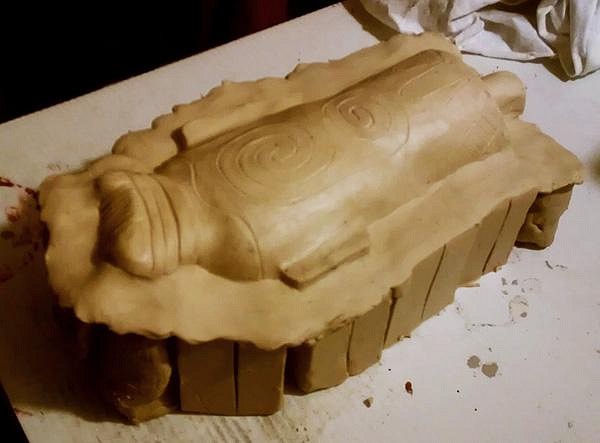
In order to create a plaster cast on the sculpt's back, a Klay platform is built-up to reach the rough center-line. I like to use new sticks of Klay cut-to-length. The top of the Klay platform is smoothed and delicately joined to the sculpt body. The trick when creating a mold is to avoid creating overhangs, where the slip-cast will not come out of the mold without tearing and shearing.
Eventually, the platform surrounds the entire mug. Note how the platform is not flat, but undulates in a quest to avoid mold overhangs. Also, notice that I changed how the platform meets the mug bottom. There's a tube there that will allow the slip to be poured into the mold. (More about this later - the tube is in a non-conventional location.)
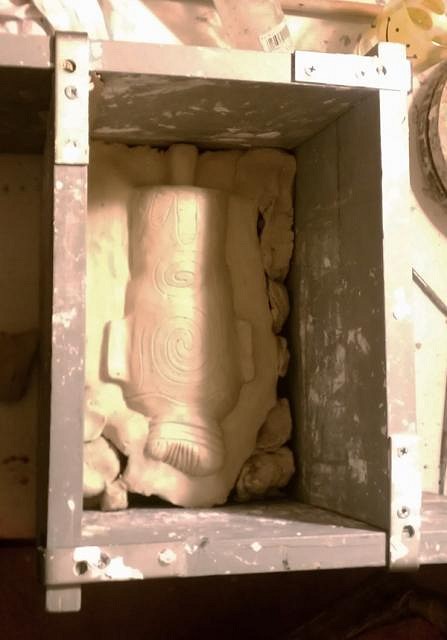
A 4-walled, adjustable casting box is placed around the result. I made the box from identical pieces of cut lumber. There are brackets on the top corners so the walls can slide back-and-forth and take on different widths and lengths. The empty gaps between the Klay platform and the walls are filled in with scrap Klay left over from previous mugs.
Eventually, the platform to smoothed out to meet the walls. Additional Klay is pressed in the wall corners to prevent any plaster leaks.
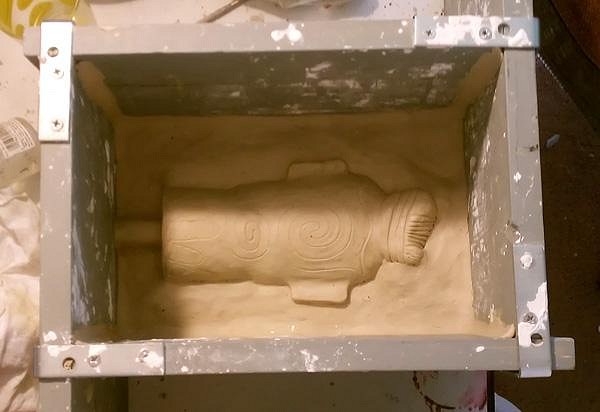
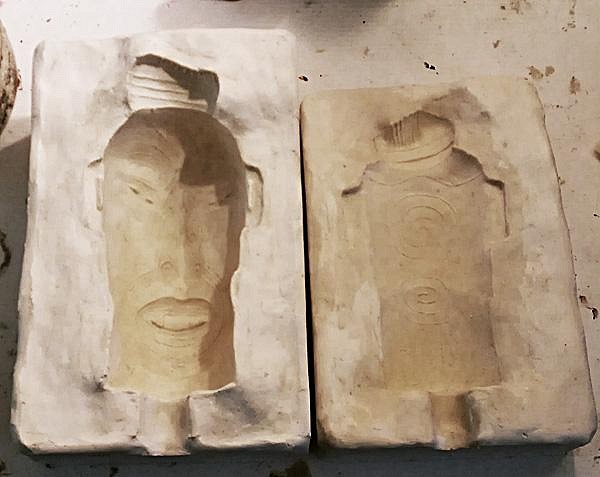
At this point, plaster is poured in. No photos for this as it's not very exciting. I buy plaster in 100 lb. bags from Aardvark Clay in Vegas. I don't measure when I prepare the plaster. I dump some in a large plastic bucket, add tap water, and mix by hand until is feels right (no too dry, not too watery). I've gotten pretty good at estimating the amount I need for a pour. (I suppose I should be more careful, but I'm all about quick-and-dirty - I need time for all my other non-Tiki pursuits!) So, the plaster is poured in the box. When it's somewhat dry (within hours in Nevada), the box is pulled apart and the Klay platform is removed. The resulting plaster half in placed on the table. The mold-box is positioned around it. Klay tubes are added to the plaster edges and the box corners to prevent leaking. A little Oil Soap is sprayed on the plaster (to prevent new plaster from sticking to the old). New plaster is mixed and poured in.
When the new plaster dries, the box and Klay is removed and the two plaster have are gently pried apart by hand. Here's the result. (The two have are the same width and length - the slope of the center line makes one look shorter.)
Now, here's where it got interesting...
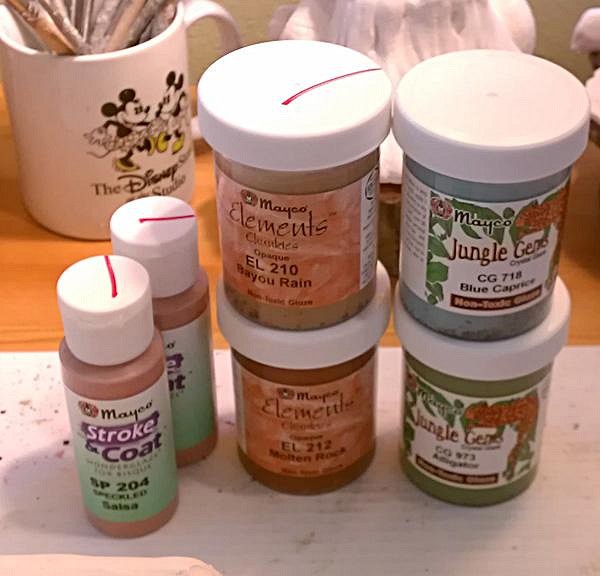
Now, while I'm waiting for the plaster to thoroughly dry (another or two), I can think about glaze. I'm going to break out of my boring Stroke-and-Coat habit, and use some crystalline glazes...
[ Edited by: BeezleBug 2012-07-27 13:38 ] [ Edited by: BeezleBug 2012-07-27 13:43 ] |
|
D
danlovestikis
Posted
posted
on
Fri, Jul 27, 2012 3:12 PM
Hi, we made two molds today. You did a great job on your photos. The clay I use that works well is Romo sculptors clay #3 and #4 for fine detail. You can use it over and over again after molding. Or as I just did with the Sacramento Crawl mug I made it in clay and bisque fired it. Then we used it to cast the molds. Great job, Wendy |
|
B
BeezleBug
Posted
posted
on
Fri, Jul 27, 2012 3:18 PM
My problem is that I like working with soft clay. I hate working with the stiffer Plasticines. However, I do like the idea of firing the master sculpt before making molds. |
|
B
BeezleBug
Posted
posted
on
Mon, Jul 30, 2012 6:29 PM
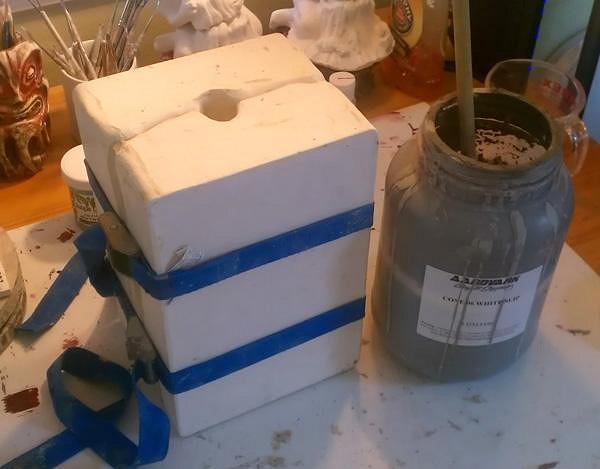
The Topknot build continues... I assembled the mold, tightened it with a couple of cargo straps, and poured in cone 06 white slip sold by Aardvark Clay. I let it sit for 2 hours, then poured out the excess. I let the remainder sit in the mold for 24 hours.
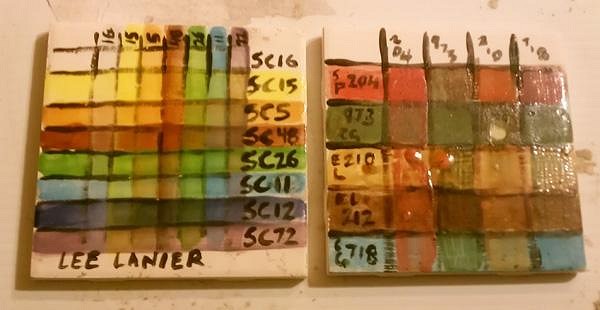
In the meantime, I fired a test tile with my new glazes. I overlap the glazes in a grid to see what combinations look like. An old test tile with Stroke And Coat glazes sits on the left while the new test is on the right.
After a day, I cracked open the mold. For a 2-piece mold, it's a very tight fit, so I had to wiggle out the mug very slowly. You can see the pour tube at the mug bottom.
Now, for clean-up. The mug top was cut along a predetermined seam to create the lid. The cut is at a down-angle so the finished lid can't fall off. A straw-hole was cut into the back of the hair. The pour tube was cut off, flattened, cut into a disc, and inserted in the resulting hole at the bottom of the mug with fresh slip as glue. The bottom was flatted by twisting the mug on a wet, flat surface. Extra slip was poured inside to thicken the bottom. The mug is 8-inches tall at this point. Now, time to let 'er dry...
|
|
B
BeezleBug
Posted
posted
on
Sat, Aug 4, 2012 11:14 AM
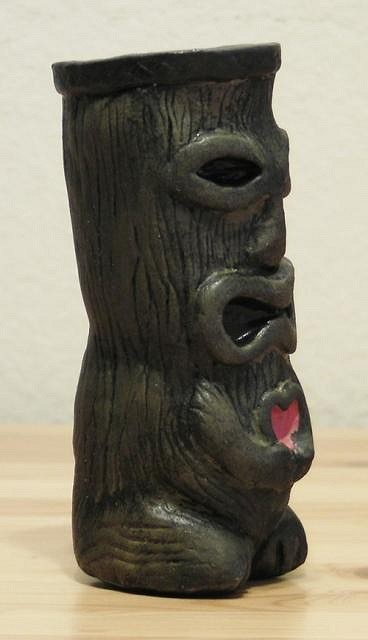
Topknot continues... Normally, I finish cast mugs with some hand tools, my thumb, and some water. This time, I thought I'd step it up a notch by sanding. It certainly helped, as the result was a smooth surface with the Maori lines clearly visible. The bisque fire was next. 1855 degrees F in a Paragon electric kiln. The mug was "candled," whereby the mug was kept under 300 degrees for the first couple of hours. As for glaze, a base coat of green matte crystalline glaze was followed by a blue gloss crystalline glaze. A ragged feather brush was used to create a wood-like grain pattern. Here's the mug after the glaze was painted:
The glaze-fire went to 1800 degrees F with the kiln lid slightly open until the last few degrees. In order to glaze the bottom, the mug was balanced on its back on some kiln stilts. Once cooled, the mug was cold-painted with red oil on the exterior, then wiped down. The red only stuck to the exposed matte areas. I love the result and am glad I decided to break out of my old glaze habits. Here she is in her final form:
|
|
M
MadDogMike
Posted
posted
on
Sat, Aug 4, 2012 12:59 PM
I missed your previous post earlier in the week. I like the angle brackets you put on you mold boards, very good idea (I'm gonna have to steal that :D ) It looks like the mold is working well, good idea to cast the mug and lid together then cut them apart. Glad to see you picked up some crystaline glazes, you'll have fun with those! |
|
B
BeezleBug
Posted
posted
on
Sat, Aug 4, 2012 2:03 PM
The mold is a bit tricky to work with. First, the pour tube is very narrow, so I have to let the slip dry inside the plaster longer than I normally would. Also, because I'm pouring upside-down, the bottom becomes thinner than the top. To offset that, I let the excess slip drip out for a long period of time and thus beef up the bottom. Last, I have to patch the hole in the bottom while the slip is still somewhat wet. But, it all pays off with a perfect-fit on the lid. Got the angle bracket from someone else - got tired of tightening clamps. |
|
M
MadDogMike
Posted
posted
on
Sat, Aug 4, 2012 2:10 PM
The red oil is a cool look. So you don't clamp the mold box, the brackets and the corner sealing clay holds it together? |
|
B
BeezleBug
Posted
posted
on
Sat, Aug 4, 2012 3:01 PM
Thanks. I like how it looks like an old piece carved wood with worn-out paint. Yes, with the brackets, which are snug, no clamps are needed - just a bit of clay at the seams. |
|
L

littlegiles
Posted
posted
on
Sat, Aug 4, 2012 5:08 PM
Love the glaze techniques you used. It turned out great. Beautiful mug.
|
|
B
BeezleBug
Posted
posted
on
Mon, Aug 6, 2012 4:27 PM
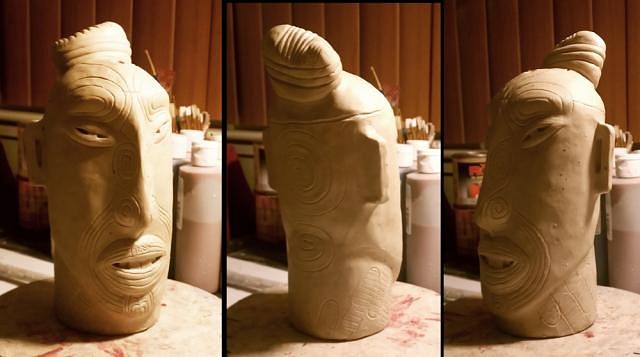
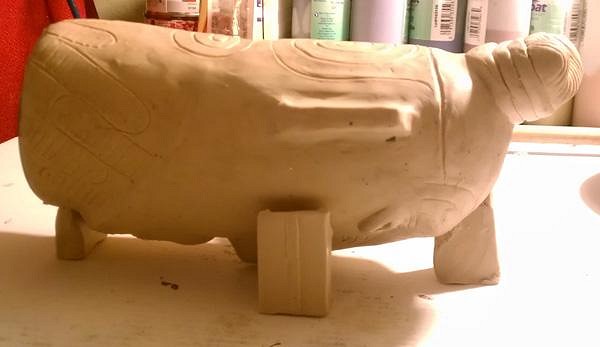
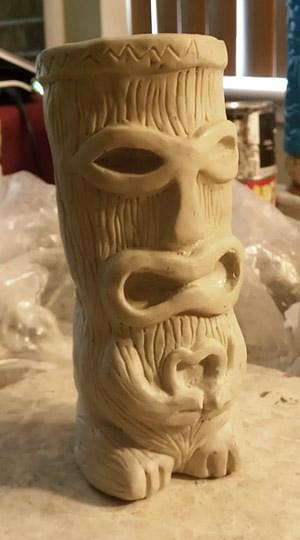
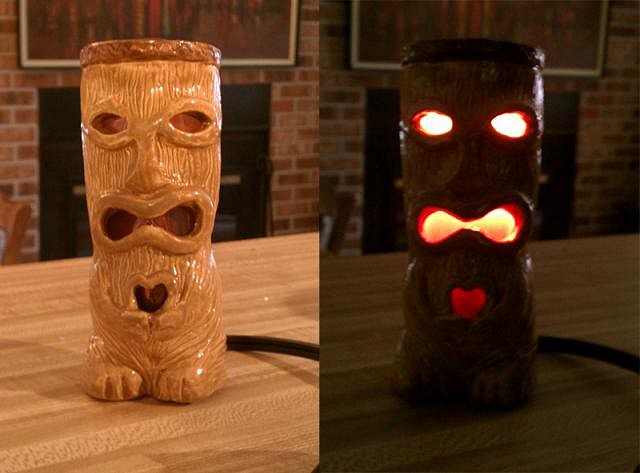
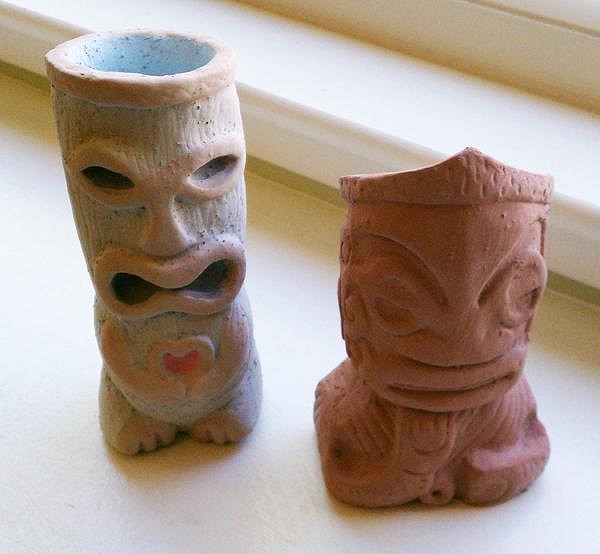
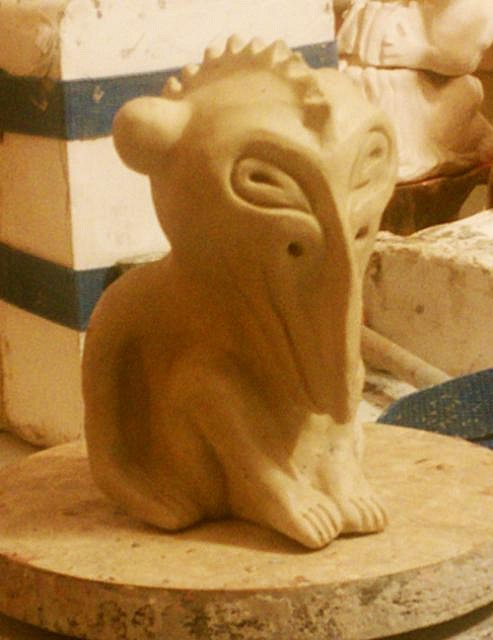
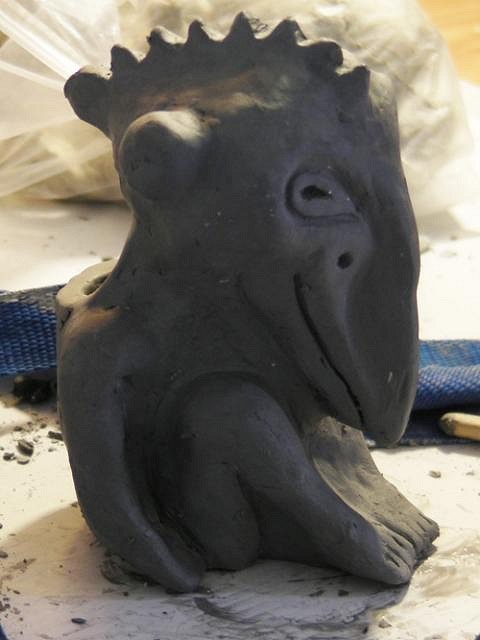
Thanks, Dale... While I'm finishing up a few Topknot mugs, as well as older Volcano Sipper mugs, thought I'd jump to my next sculpt. Here he is, Peanut Jr.:
Yep, he's inspired by the PMP Peanut mugs. I didn't look at any reference while sculpting him, hence the funny feet and other non-standard traits. Why a PMP Peanut mug? - because they make swell night lights:
I'm made and sold a couple Peanut night lights. I wanted to make more, so I thought I'd sculpt something specifically lamp-like. Peanut Jr. will have his eyes, mouth, and little heart cut out and he'll be wired up with an orange bulb. |
|
B
BeezleBug
Posted
posted
on
Fri, Aug 24, 2012 4:15 PM
Some more crystalline glaze experimentation...
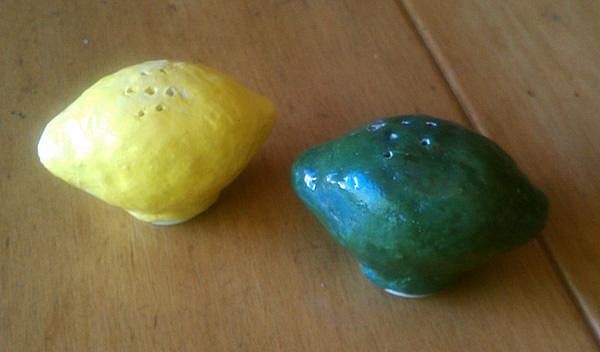
Plus, some fun salt and peppers shakers designed by my niece Alysa. She helped sculpt the lemon/lime and pour the mold.
|
|
B
BeezleBug
Posted
posted
on
Tue, Sep 11, 2012 9:00 AM
First Peanut Jr. lamp assembled...
|
|
M
MadDogMike
Posted
posted
on
Tue, Sep 11, 2012 11:19 AM
Beezle, I missed that crytalline glaze piece - looks great! |
|
B
BeezleBug
Posted
posted
on
Tue, Sep 11, 2012 11:58 AM
Thanks. I really dig painting two dissimilar crystalline glazes on top of each other, then cold painting over the top of that with oil. |
|
B
BeezleBug
Posted
posted
on
Tue, Sep 11, 2012 1:52 PM
Here's a new venture... As part of an Indiegogo campaign for a the "BedBugs" movie I'm working on, I'm offering custom Tiki mugs as a perk: http://www.indiegogo.com/bedbugsthemovie It's the $375 perk level... Check out the trailer - it's fun.
[ Edited by: BeezleBug 2012-09-11 13:57 ] |
|
B
BeezleBug
Posted
posted
on
Sat, Sep 15, 2012 12:08 PM
Topknot #4. More glaze fun...
|
|
B
BeezleBug
Posted
posted
on
Sat, Sep 15, 2012 12:16 PM
New mug in the works:
I call him "Que" after the Mar_que_sas and the fact he looks like he's saying "what?" |
|
D
danlovestikis
Posted
posted
on
Sun, Sep 16, 2012 7:06 AM
Que is very nice. Wendy |
|
B
BeezleBug
Posted
posted
on
Fri, Sep 21, 2012 12:47 PM
New mugs, Que #1 and Peanut Jr. #1, patiently awaiting a glaze fire...
|
|
B

Beachbumz
Posted
posted
on
Sat, Sep 22, 2012 12:55 AM
Beautiful Mugs! I'm loving Topknot and da new Que.. |
|
B
BeezleBug
Posted
posted
on
Sat, Sep 22, 2012 10:36 AM
Thanks Beachbumz. Here's Que 1. It's always like Christmas when I open up the kiln in the morning. Never sure what crazy result I'll get by combining glazes...
|
|
Z

zerostreet
Posted
posted
on
Sat, Sep 22, 2012 10:47 AM
That looks awesome! Nice job! |
|
B
BeezleBug
Posted
posted
on
Sun, Sep 23, 2012 9:35 PM
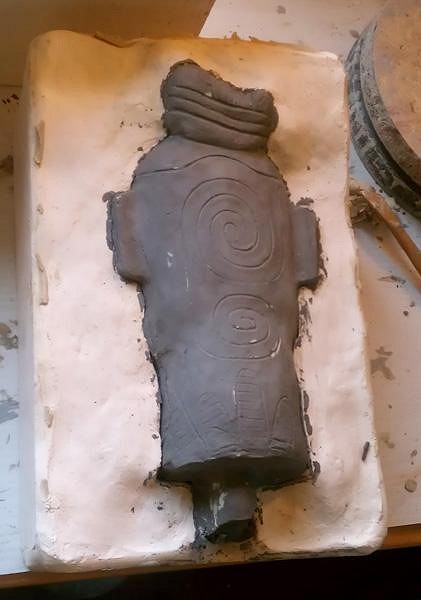
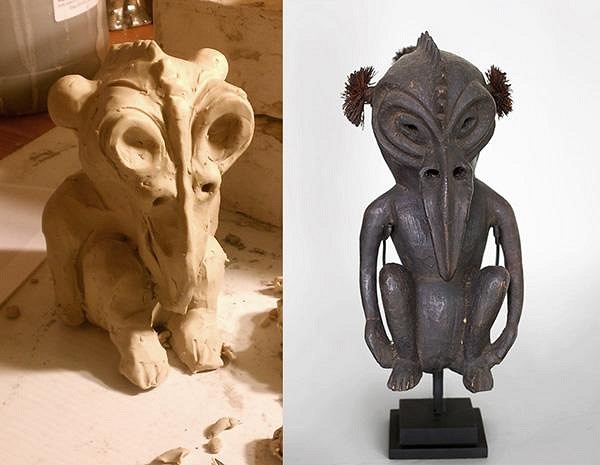
Thanks zerostreet... Here's an early sculpt of another new mug based on a Kwoma figure from Papua New Guinea, Sepik River Region. Still need to work out the proportions and how it's going to accept tasty beverages...
[ Edited by: BeezleBug 2012-09-23 21:38 ] |
|
M
MadDogMike
Posted
posted
on
Sun, Sep 23, 2012 9:59 PM
Great looking glaze on the Que, love the new PNG sculpt. |
|
B
BeezleBug
Posted
posted
on
Mon, Sep 24, 2012 10:59 AM
Thanks MadDog...love the pirate-y pursuits. Here's a Peanut Jr. mug. Been on a green/blue glaze kick lately, but now I'm returning to browns... Time to stock up on more crystalline glazes.
Oh, if anyone uses Pinterest, I'm keeping samples of my more recent mugs here: http://pinterest.com/leelanier/beezlebug-tiki-mugs/ [ Edited by: BeezleBug 2012-09-24 11:23 ] |
|
B
BeezleBug
Posted
posted
on
Tue, Sep 25, 2012 9:25 AM
Pimpin' it with some gold finish today...
|
|
B
BeezleBug
Posted
posted
on
Tue, Sep 25, 2012 11:25 PM
Alright, Kwoma is ready to cast... Uh oh, left myself with another complicated mold...
|
|
B
BeezleBug
Posted
posted
on
Mon, Oct 1, 2012 6:07 PM
Mold for Kwoma mug. Only 6 pieces, so not too horrible...
|
|
D
danlovestikis
Posted
posted
on
Mon, Oct 1, 2012 6:11 PM
He's really nice. Wendy |
|
B
BeezleBug
Posted
posted
on
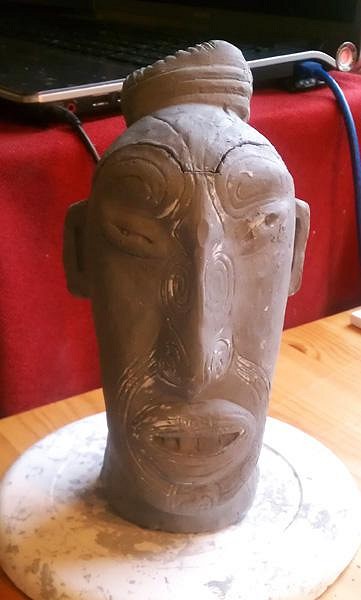
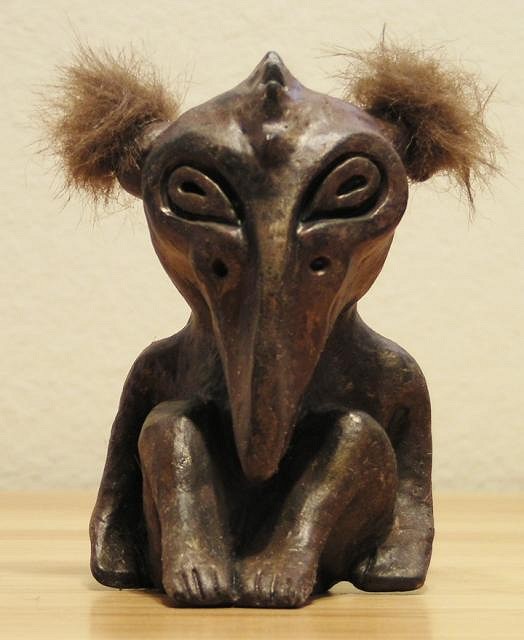
Thu, Oct 4, 2012 10:53 AM
Thanks, Wendy... First Kwoma mug out of the mold...
|
|
B
BeezleBug
Posted
posted
on
Wed, Oct 10, 2012 12:17 PM
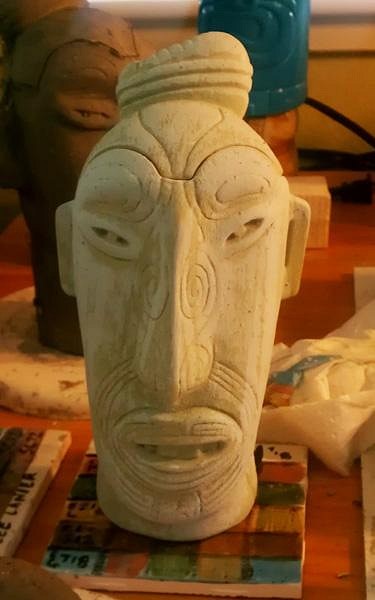
Kwoma #1 is finished...
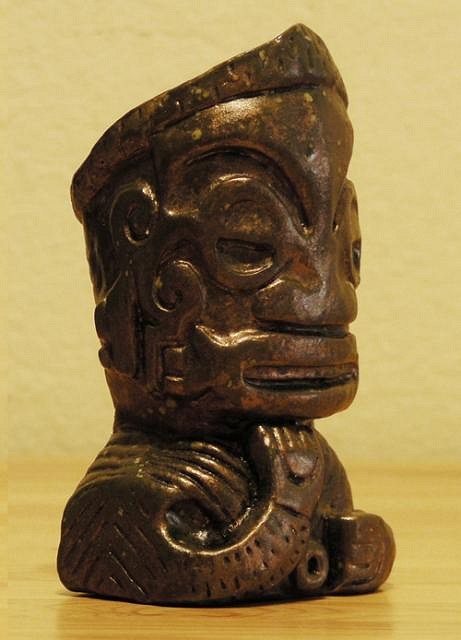
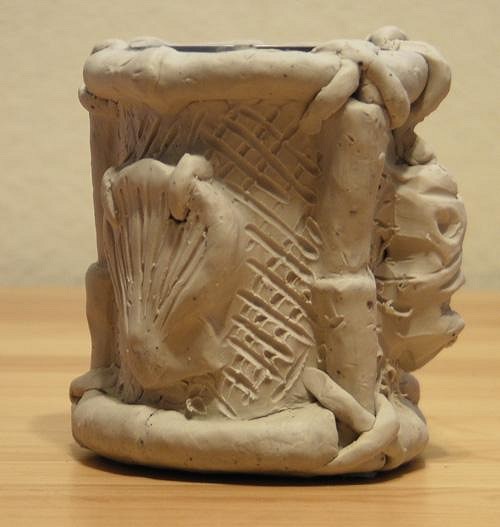
I was asked to replicate the finish of the original wood sculpture, which was an interesting challenge. So, here were the steps: 1) Instead of sanding or smoothing the cast, cut in tons of tiny tools marks; 2) glaze with multiple layers of black and brown gloss; 3) after firing slightly below the recommended temp, sand the surface with 600 grit; 4) burnish with black oil; 5) burnish with metallic bronze and gold oil; 6) burnish with brown oil; 7) spray outside with clear matte finish. The "hair' is synthetic fur attached with silicon glue. I've also started a new mug. This one is a chunky bamboo, reed, and seashell tumbler - something that Gilligan might have made for Thurston Howell III for his evening cocktail of coconut liquor.
|
|
D
danlovestikis
Posted
posted
on
Wed, Oct 10, 2012 12:42 PM
Hey thanks so much for all the glazing information. I know that to make something look old is hard work. I have yet to master that and you just helped. Thank you, Wendy |
|
B
BeezleBug
Posted
posted
on
Wed, Oct 10, 2012 12:56 PM
I've been experimenting with glaze since I got my little electric kiln. Sometimes, the glazes come out pretty darn weird. I don't stock many glazes, but I do mix them or layer them. One thing I hit upon - out of necessity - is that you can fix or improve any exterior glaze with cold-painting and burnishing. |
|
B
BeezleBug
Posted
posted
on
Thu, Oct 25, 2012 4:04 PM
Yay - one of my Peanut Jr. lamps is now on the shelf at Forbidden Island (thanks to Lisa Michelle).
|