Tiki Central / Other Crafts
BeezleBug Mugs (Pg. 14: Paintings)
|
B

BeezleBug
Posted
posted
on
Wed, Dec 9, 2009 6:29 PM
Ah - that's good to know about the foamcore... I used fancy-pants gaffer's tape instead of duct tape... |
|
P

pdrake
Posted
posted
on
Wed, Dec 9, 2009 6:43 PM
i use hot glue and foamcore. well, that's for silicone molds. might not work for plaster, i guess it should. |
|
G

GROG
Posted
posted
on
Thu, Dec 10, 2009 10:41 AM
GROG used foamcore and hot glue, and it worked out fine on GROG's plaster molds. No aluminum foil. |
|
M

MadDogMike
Posted
posted
on
Thu, Dec 10, 2009 11:20 AM
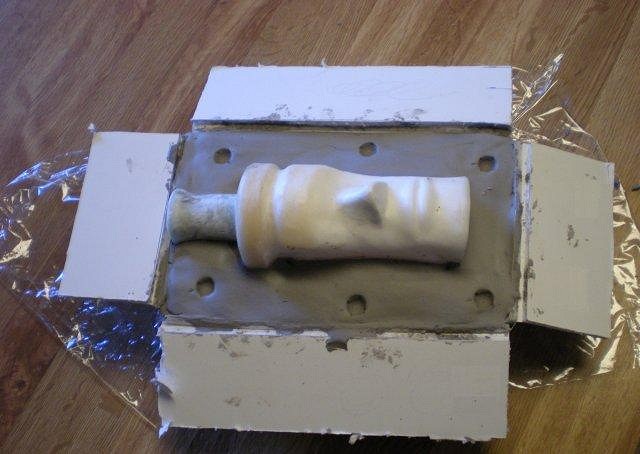
I'm sure you guys don't need any mold making tips from me, but I used foamcore so I could fold it down out of my way to work
It allows me to work the clay around my wax master without the form in the way. I fold the flaps up, tape it together, and use clay to seal the corners.
|
|
B
BeezleBug
Posted
posted
on
Thu, Dec 10, 2009 9:17 PM
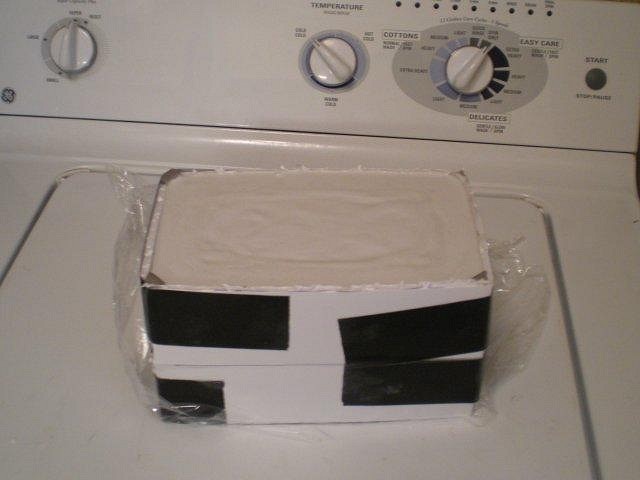
Ha - we have that same exact washing machine... I haven't worried to much about the bubbles - they never seem to appear anyplace bad... |
|
B
BeezleBug
Posted
posted
on
Sat, Dec 12, 2009 12:00 PM
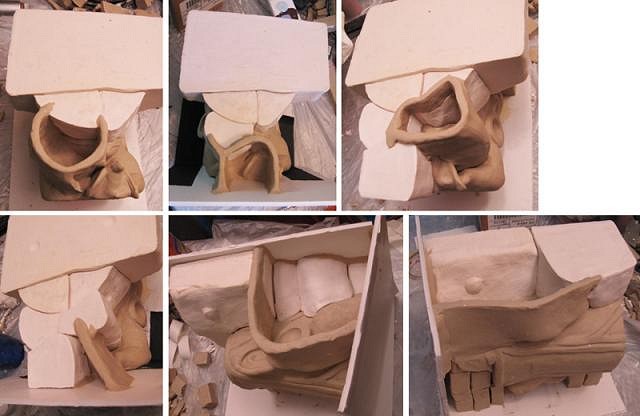
A few more steps on the Solomon mold...
I know it looks like the mold of a mad man, but I have a plan (insert eveil laugh here). |
|
B
BeezleBug
Posted
posted
on
Tue, Dec 15, 2009 1:51 PM
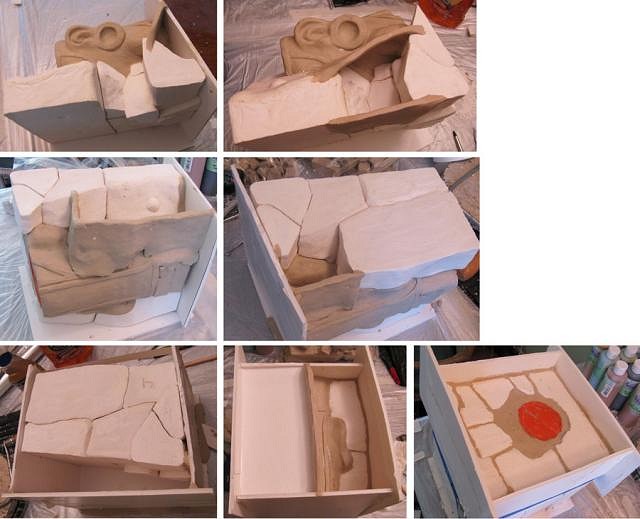
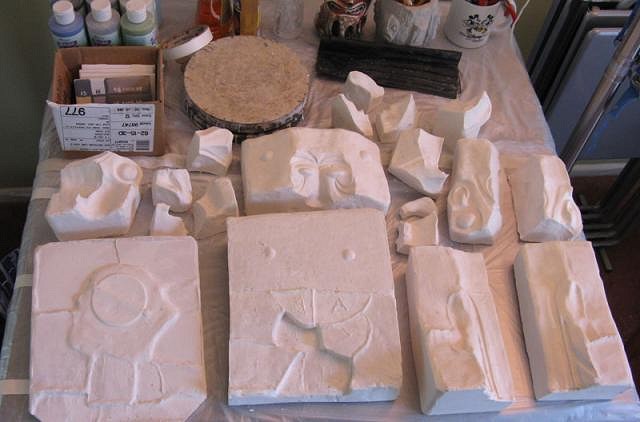
Final Solomon mold making steps...
Here are all the parts laid out. 19 of 'em...
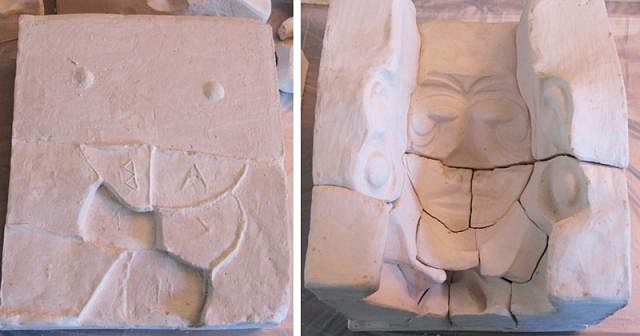
Since there are so many little pieces for the face, hands, and bird, I cast an outside wall so the pieces had something to lock into. The wall is on the left below. The loosely assembled face is on the right. There are definitely a few part lines that will have to be removed, but at least I didn't have to alter my sculpt for the mold.
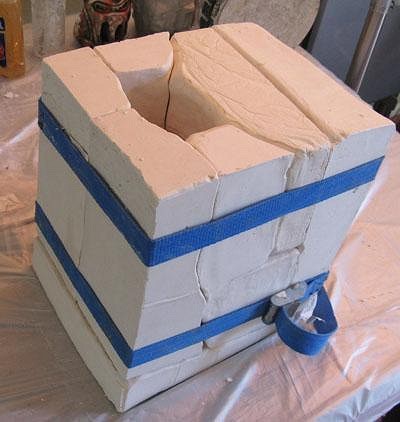
Here's the assembled mold. As soon as it dries out, I'll pour some slip...
|
|
T

Tobor64
Posted
posted
on
Tue, Dec 15, 2009 2:21 PM
Wow! That is one elaborate mold. Thanks for the pics of your progress on this & I hope to see more. |
|
M
MadDogMike
Posted
posted
on
Tue, Dec 15, 2009 5:34 PM
HOLY CRAP!!!! :o 19 pieces! You da mold MASTER!!! :) |
|
G
GROG
Posted
posted
on
Tue, Dec 15, 2009 5:40 PM
|
|
B
BeezleBug
Posted
posted
on
Tue, Dec 15, 2009 9:37 PM
Thanks for the informative link! I guess I have a real problem if the mold starts spreading to other parts of the house. Right now, it's contained to the garage sink and my little mug-making station in the Rumpus Room. (Hmmm, is that plaster I smell?) |
|
B
BeezleBug
Posted
posted
on
Sun, Dec 20, 2009 11:19 PM
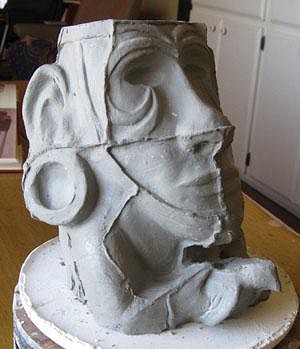
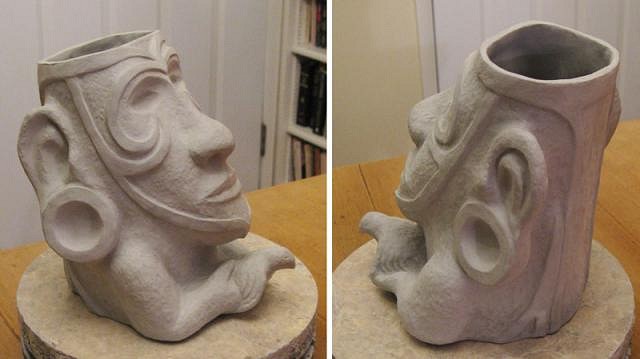
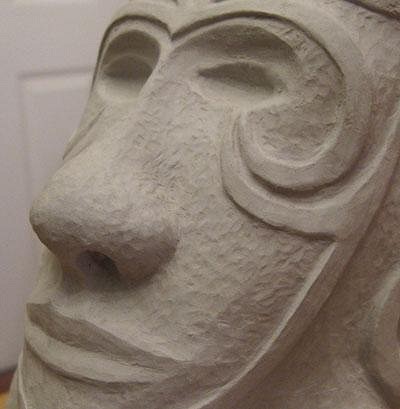
Here's Solomon #1 fresh out of the mold. The poor guy looks like Frankenstein. The hardest part was figuring out how to take apart the mold without inducing stress fractures. Nevertheless, he survived pretty well. Now that I know the order of events, the next one should be easier.
Here he is cleaned up:
I wanted to give him a chiseled, slightly irregular look, so I added a bunch of tiny tool marks...
I think I'll pour one more before bisque firing. I'm also going to do some glaze tests this time so I won't be surprised by the final colors. |
|
LT

LOL Tiki
Posted
posted
on
Sun, Dec 20, 2009 11:29 PM
I'm looking forward to seeing how this one turns out. Nice work so far! |
|
M
MadDogMike
Posted
posted
on
Mon, Dec 21, 2009 7:13 AM
Simply amazing! |
|
G
GROG
Posted
posted
on
Tue, Dec 22, 2009 3:52 PM
Good job. |
|
S

Sneakytiki
Posted
posted
on
Tue, Dec 22, 2009 4:06 PM
Nice!!!!!!!!!! |
|
P
pdrake
Posted
posted
on
Tue, Dec 22, 2009 5:16 PM
that's the best one yet. the mold made my head hurt, though. :) |
|
B
BeezleBug
Posted
posted
on
Fri, Jan 15, 2010 6:36 PM
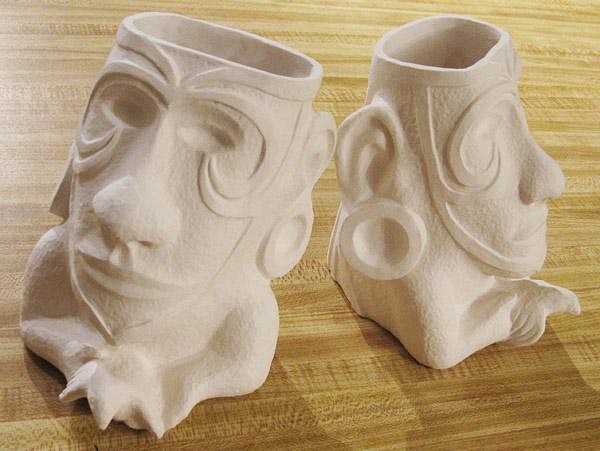
Solomon #1 and #2 survived the fire! I was afraid they might crack, but they came through unscathed. Now for some glaze...
|
|
M
MadDogMike
Posted
posted
on
Fri, Jan 15, 2010 6:51 PM
Way cool! I see some nice texturing there |
|
T

teaKEY
Posted
posted
on
Fri, Jan 15, 2010 7:14 PM
I will have to post mine. My dad did the same design for me as a surprize for Christmas. I still have yet to see the glazed version but its pretty true to the actually design. Stay tuned and I will with this. |
|
GT

GO TIKI
Posted
posted
on
Sat, Jan 16, 2010 10:01 PM
Looking Real Good, I like them :) |
|
M
MadDogMike
Posted
posted
on
Sun, Feb 7, 2010 7:54 PM
Bump! |
|
B
BeezleBug
Posted
posted
on
Sun, Mar 14, 2010 2:04 PM
Once again, I've been away from the forum too long. Here's proof, however, that I've managed to get a little work done on the Solomon mugs...
It's a work-in-progress on the glaze for #1. When fired, it will be a weathered black over brown with off-white Z's and a pattern on the ear plugs. Before I move onto #2, I'm firing #1 to make sure I like the result. The eye irises will be epoxied stones. On a semi-related note, I've been working on a daily comic strip for awhile. Each day is a bizarre dream I had the night before. As it happens, on March 6, I drempt of a rather tiki-ish character...
You can see all the comics here: |
|
M
MadDogMike
Posted
posted
on
Sun, Mar 14, 2010 2:15 PM
Lee, I'm excited to see it glazed - now on with the firing! |
|
LLT

little lost tiki
Posted
posted
on
Sun, Mar 14, 2010 7:55 PM
that is gonna look FREAKIN AWESOME Bravo! |
|
B
BeezleBug
Posted
posted
on
Fri, Mar 26, 2010 12:23 AM
Yay! Solomon #1 is finally finished.
(Shhh...I think he's gazing into the future...or maybe he had too much coffee...) He's going up on E-Bay soon. More photos there. |
|
T
Tobor64
Posted
posted
on
Fri, Mar 26, 2010 1:22 PM
Yeeouch! Just saw this on eBay & I've got to say it's a beaut! Well done! |
|
M
MadDogMike
Posted
posted
on
Fri, Mar 26, 2010 1:45 PM
Very nicely glazed Beezlebug, has a great rustic look to it |
|
G
GROG
Posted
posted
on
Fri, Mar 26, 2010 1:57 PM
Most excellent. GROG like. |
|
B
BeezleBug
Posted
posted
on
Fri, Mar 26, 2010 4:33 PM
Thanks! The hardest part of the glaze was painting all the little Z's - then intentionally dirtying them up and wiping away some of them for the rustic aged look. I was tempted to keep the Z's pristine, but it looks better this way. |
|
B
BeezleBug
Posted
posted
on
Sun, Apr 11, 2010 10:44 PM
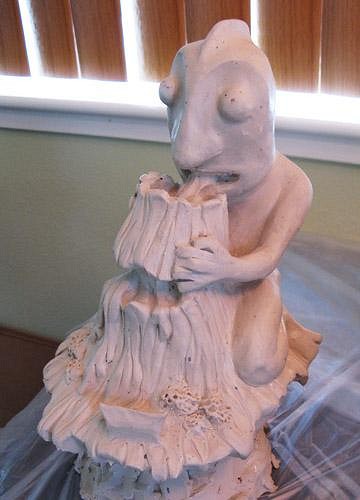
While I'm finishing up the Solomon mugs (I should have #2 and #3 done next week), I thought I'd sketch up my next mug design...
This one has a giant god clasping a volcano and sucking out the lava. Perhaps he's thirsty, or maybe he's saving the small village below. The entire top would come off as a lid. There will be a place to stick a straw so it would reach to the bottom of the volcano. I roughed in PNG spirit protector, but I haven't decided which specific Oceanic figure to use yet. Should keep me busy. |
|
M

mp
Posted
posted
on
Mon, Apr 12, 2010 2:08 AM
Really cool idea Beezlebug! The Solomon mugs look awesome. |
|
N

nuKKe
Posted
posted
on
Wed, Apr 14, 2010 12:27 AM
Love the Solomon mug - especially the eyes. And you made me curious about the new design - looking forward seeing it in clay. |
|
TL

Tiki Lee's
Posted
posted
on
Wed, Apr 14, 2010 1:13 AM
Hi Beez! I just found this thread and have to congratulate you on doing the incredibly difficult job of "ga-jillion part mold-making!" Solomon is wonderful... I bet the volcano guy is gonna take a "ga-jillion plus more" part mold. Good Luck; I can't wait to see it! Stop by the store some Sunday and say Hi. I'd love to meet you... AND Solomon! |
|
B
BeezleBug
Posted
posted
on
Wed, Apr 14, 2010 8:06 PM
Ha-ha...yes, the new mug will necessitate way too many mold parts. I've been studying up on figure casting, so I have some ideas on how to pull it off. However, I'll probably make some more sketches before throwing the clay around. I do need to drop by your place, Tiki Lee (especially since we share the world's best name - Lee!). Sometime soon... |
|
B
BeezleBug
Posted
posted
on
Wed, Apr 14, 2010 9:23 PM
I just listed Solomon #2 on my new Etsy account: |
|
M
MadDogMike
Posted
posted
on
Thu, Apr 15, 2010 1:06 PM
Beezle, I don't see your mug on that page? |
|
B
BeezleBug
Posted
posted
on
Thu, Apr 15, 2010 2:38 PM
The mug sold fast. You can see pix in the "Sold" section. Otherwise, I just added Solomon #3 to the Etsy site. |
|
M
MadDogMike
Posted
posted
on
Thu, Apr 15, 2010 2:54 PM
Congrats on the quick sale, #3 looks great too :) |
|
B
BeezleBug
Posted
posted
on
Fri, Apr 16, 2010 3:46 PM
Here's another Volcano Sipper sketch...
The figure is based on an Easter Island protector that was made from tapa and bullrushes and kept near the door to ward off bad spirits. [ Edited by: BeezleBug 2010-04-16 22:43 ] |
|
B
BeezleBug
Posted
posted
on
Fri, Apr 16, 2010 10:35 PM
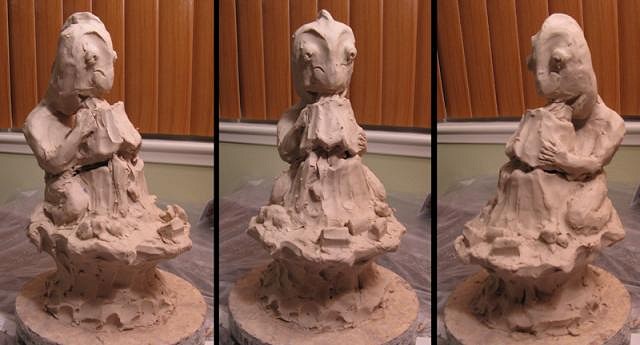
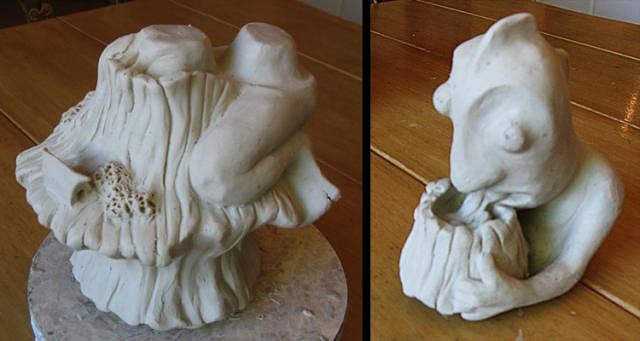
Rough sculpt. it's a two-hand mug - you have to use two hands on the base to pick it up.
|
|
T
Tobor64
Posted
posted
on
Sat, Apr 17, 2010 7:57 AM
Looking good so far...Can't wait to see what you do with this one. |
|
M
MadDogMike
Posted
posted
on
Sat, Apr 17, 2010 8:07 AM
Beezle - that's WILD!!!!! :D |
|
B
BeezleBug
Posted
posted
on
Sun, May 23, 2010 10:30 AM
Update on the Volcano Sipper...
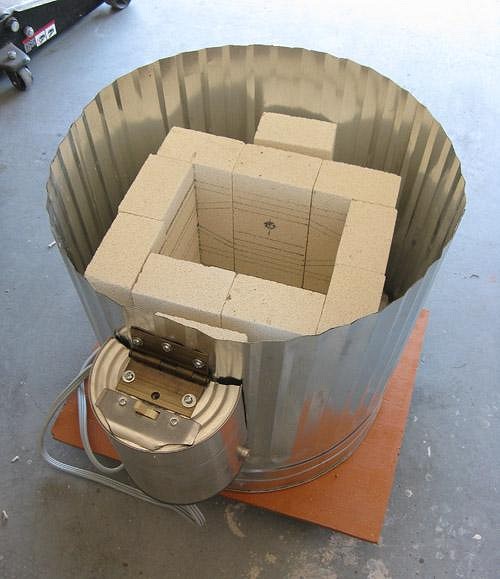
Plus, I thought I'd go all mad scientist and build my own low-fire kiln. Here's the start...
I tracked down some old plans for a kiln built out of a steel oil drum, so I thought I'd try a cut-down trashcan. I'm using 2300 degree refractory brick. The base bricks (out of sight) are set on their side and are cut and cemented into a hex shape. For now, the side bricks are placed loosely as I plan out the resistance wire grooves. Once the walls are grooved, cemented, and braced, all the empty voids between the brick and the can will be filled with vermiculite. There will also be a lift-off lid made of bolted-together bricks. The control box is half a paint can that is hinged so I can get to the wiring. The resistance wire will be sent through the can via ceramic-insulated pass-through bolts. The 20 amp switch is using high-temp appliance wire. There will be a peep hole and a tiny shelf on the opposite side for peeking at self-supporting pyrometric cones. I have the whole thing set on a wooden base that I can caster around the garage. The kiln firing space is 7x9x9". It'll produce roughly 1700 watts at 14 amps using 144 inches of coiled AWG 11 Kanthal wire. Since I work at cone 06 for everything, I figure it should be sufficient. (Turns out algebra is useful for some things!) If you want a good book on kiln math, track down "Electric Kiln Construction for Potters" by Robert Fournier. [ Edited by: BeezleBug 2010-05-23 15:09 ] |
|
M
MadDogMike
Posted
posted
on
Sun, May 23, 2010 3:47 PM
OK Beezle, you get the Mad Scientist Award!!! Have you made provisions for a Low/High or Low/Med/High temp setting for a slower firing? The Volcano Sipper sculpt is looking way cool! |
|
B
BeezleBug
Posted
posted
on
Sun, May 23, 2010 4:59 PM
No...no temp control just yet... However, the circuit design can be converted to a low/high heat switch (one that switches between series and parallel wiring) if the kiln proves unruly. I'm setting up the resistance wire grooves and pass-through connectors for just such an option. I'm trying the low-tech approach first. Robert Fournier says he's fired much of his work with nothing more than a "switch and a cone" for 30 years. |
|
B
BeezleBug
Posted
posted
on
Mon, May 31, 2010 2:32 PM
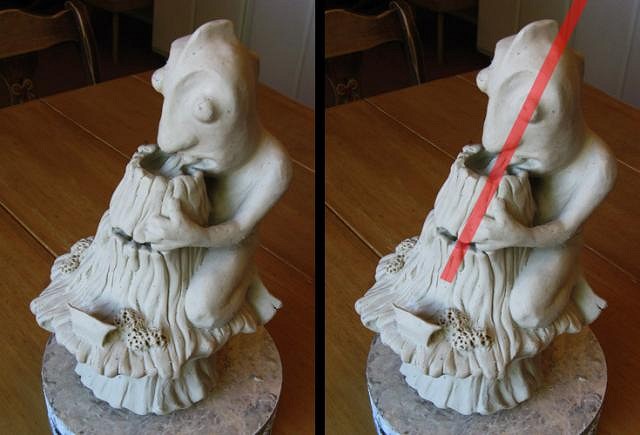
The Sipper sculpt is almost ready for mold-making. Here's how it's designed to work with a straw...
The straw (red line) goes through an opening at the top of the head, through the lava tube going into his mouth, through the volcano cap, and into the base. The entire top is actually a lid which can be removed for pouring in a tasty liquid beverage...
|
|
B

Babalu
Posted
posted
on
Mon, May 31, 2010 5:30 PM
Great work on the new mug design Beezle! And you made your own kiln!!...yes sir, very nice. hope the mold build up goes smooth for you :) |