Tiki Central / Other Crafts
BeezleBug Mugs (Pg. 14: Paintings)
|
B

BeezleBug
Posted
posted
on
Wed, Oct 1, 2008 8:43 PM
Howdy folks, I've seen so much great art and so many creative ideas on Tiki Central in the last few months that I just had to try my hand at mug making. Here's my first slipcast attempt:
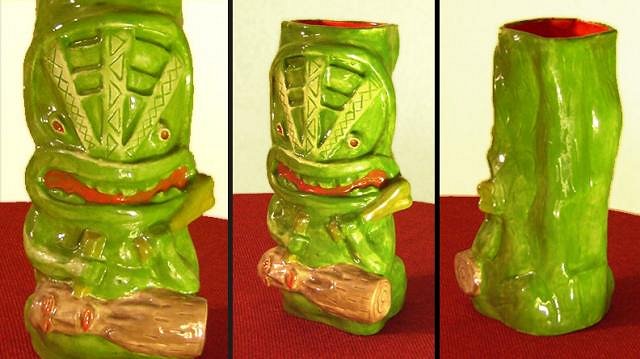
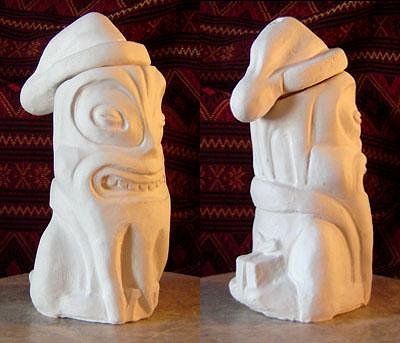
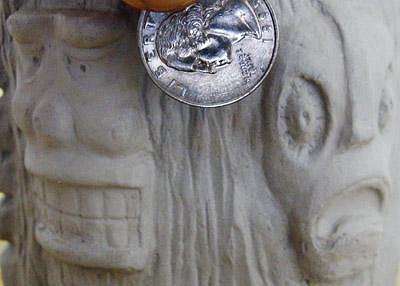
I call him "Tiki Carver." He's using primitive tools to carve a little tiki out of a chunk of palm wood. He's about 7 inches tall and holds a hearty 15 ounces. When I get some time, I'll post information on how I made him. It was all the cool "how to" posts in this forum that inspired me to try my hand at this in the first place. I've made six of the "Tiki Carvers" and am currently finishing up the glazing. I had thought of selling 4 of them on E-Bay. I'll post in the marketplace forum when it comes time. I have to say that I'm hooked on slipcasting. It's a messy, complicated art form, but I can't wait to get the next mug into the kiln. Here's my next design:
I call him "South Seas Santa." He's hiding a present behind his back in case he runs into any good Tiki children. When he's finished, his cap will be removable. Strangely enough, I completed the sculpt about a week before Go Tiki posted pics of his "Mo-Ho-Ho-Ho" mug. I guess great minds think alike! I also hope to have a few to sell before December. [ Edited by: BeezleBug 2015-06-07 20:00 ] [ Edited by: BeezleBug 2015-06-07 20:02 ] |
|
B

Babalu
Posted
posted
on
Wed, Oct 1, 2008 10:08 PM
Welcome to TC Bee....always good to have another clay person around. Keep cranking out the work and posting. You've got some real nice first mugs here.. way to pick the ball up and run...go bee, go. |
|
B
BeezleBug
Posted
posted
on
Wed, Oct 1, 2008 10:55 PM
Thanks, Babalu. It was actually your thread on the OkiDoki mug that got me jazzed enough to start sculpting. |
|
M

MadDogMike
Posted
posted
on
Thu, Oct 2, 2008 7:09 AM
Isn't this fun!!!? Great mugs, keep up the good work! |
|
B

Bowana
Posted
posted
on
Thu, Oct 2, 2008 10:27 AM
Nice one, Beezlebug! Let's see what else ya got. Welcome aboard! |
|
LLT

little lost tiki
Posted
posted
on
Thu, Oct 2, 2008 11:32 AM
very nice! |
|
B
BeezleBug
Posted
posted
on
Thu, Oct 2, 2008 12:03 PM
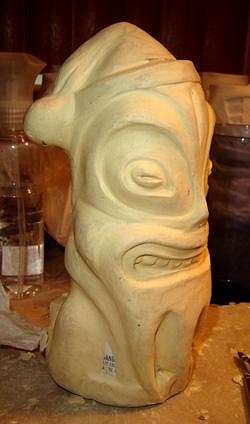
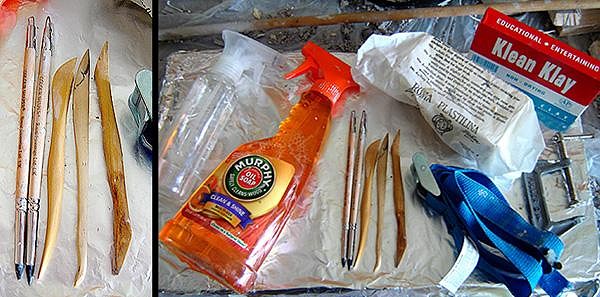
Thanks MadDogMike, Bowana, and Little Lost Tiki. More mugs on the way... As promised, here's a behind-the-scenes look at my mug-making process. Many of the ideas came from other mug makers on this site... I started with Roma Plastilina No. 2 over five lengths of PVC pipe hot glued together. I wanted a shape that was less cylindrical and more dimensional. No. 2 is pretty stiff, so it gives your hands a good work out - but, it holds its place well so the sculpt can be handled. The little Tiki guy overhangs the base and sides quite a bit, so I counted on creating a 5 piece mold.
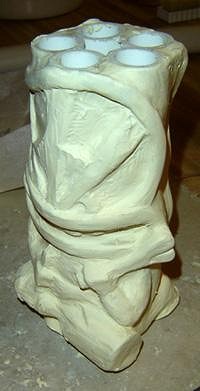
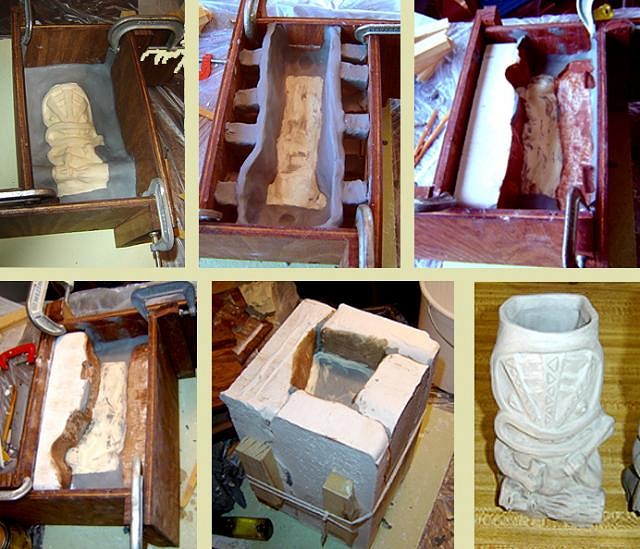
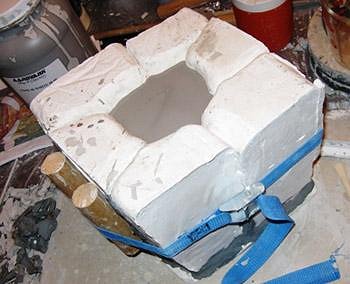
To make the mold, I built a set of mold walls out of scrap wood. First, I cast his front by surrounding the sculpt with cheap, gray, non-drying child's clay (he kinda' looks like Han Solo in carbonite). I used generic Plaster No. 1 to pour each mold piece. After the front, I flipped him over and cast his back (which is an abstracted piece of wood). I built walls from the gray clay. For supports, I cut off lengths of the square clay tubes. Next, I cast his right side, then his left side. Last, I cast the bottom. At this point, I didn't have any straps , so I tied the mold togther with string and added wood blocks to make everyhting tight. I used some old shellac I found in the garage to cover the cast plaster parts that came in contact with new plaster (although I've since switched to Murphy's Oil Soap). With the plaster dry, I used pre-mixed, non-toxic Amaco slip to slipcast the actual mug. All the fine lines on the mug were added during the clean-up phase. One challenge was getting the slip to mix consistently. The first two mugs wound up shrinking more than the last four.
The slip fired at cone 05. I had an acquaintance at the local art center do the firing for me. I used 2 to 3 coats of Stroke And Coat glaze. Thumb Green, Candy Apple Red, Sunkissed, and a mixture of those colors. Stroke And Coat fires at cone 06, doesn't really drip, and is easy to apply. It comes out very bright and vibrant, however, so it might be considered too happy and neon-ish compared to the dark browns and greens of many Tiki mugs. One thing I'll need to practice is getting a good consistency of my glaze thickness. My first mug came out a little too splotchy for my taste.
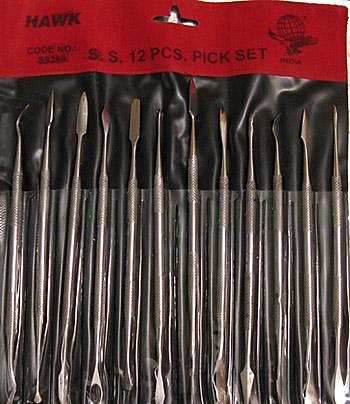
Here are the tools I relied on the most. Two Colour Shapers with rubber tips (one pointed and the other flat). Miscellaneous wood clay tools. Water spray bottle. Orange Murphy's Oil Soap. Murphy's works well as a mold soap, and can be used to smooth out the Plastilina sculpt. Plus, it's non-toxic and has a lovely orange scent. Nylon straps for holding the mold together. Plastilina No. 2. "Klean Klay" child's clay, which is super-cheap but is probably too greasy as it sticks to the Plastilina too much. C-clamps. And big dowel to mix the slip. I've also picked up a miniature lazy susan. [ Edited by: BeezleBug 2008-10-03 22:05 ] |
|
B
BeezleBug
Posted
posted
on
Thu, Oct 2, 2008 12:07 PM
I had thought of trying out several different glaze combinations on the remaining 5 Carver mugs. Any thoughts out there? Maybe one with a solid color like a more traditional brown? Or, maybe, I could layer the glazes to better define his arms and hands and other detail and help knock down the intensity of the green. He turned out more pea-green than I had originally intended. [ Edited by: BeezleBug 2008-10-03 21:21 ] |
|
RH

Robb Hamel
Posted
posted
on
Sun, Oct 5, 2008 7:43 AM
Tiki Carver is very cool, very unique. Let's see more. |
|
B
BeezleBug
Posted
posted
on
Sat, Oct 11, 2008 8:20 AM
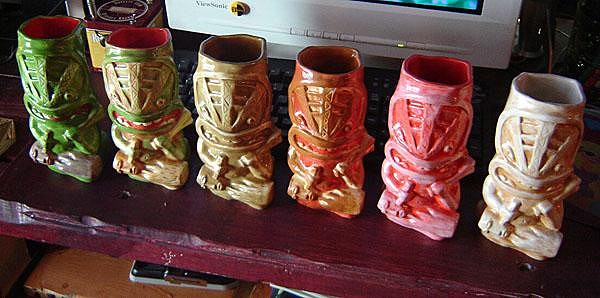
I decided to be daring and glaze all the "Tiki Carver" mugs differently. I figured I needed to practice my glazing technique and needed see what colors worked together. Here's the result:
The local ceramics expert told me that many elderly folk hated glazing because they could never correlate the unfired glaze color with the fired glaze color. I can see why - you can get some wacky results if you're not careful. In any case, I'm selling a few of these now and have posted to the marketplace. I also have the first batch of "South Seas Santa" mugs bisqued:
It'll be fun trying to get glaze into the cavity formed by the Christmas present he's holding behind his back. I'll have to build a right-angle brush! Or, maybe I can just slosh the glaze around enough to get it covered. |
|
M
MadDogMike
Posted
posted
on
Sat, Oct 11, 2008 8:50 AM
Lookin' good! I have to confess that I prefer the traditional (boring) brown to the bright frog green :) |
|
B
BeezleBug
Posted
posted
on
Sat, Oct 11, 2008 1:39 PM
Brown works for me too. The bright green was supposed to be dark, muted green, but it didn't quite fire that way. |
|
B
BeezleBug
Posted
posted
on
Mon, Oct 27, 2008 6:10 PM
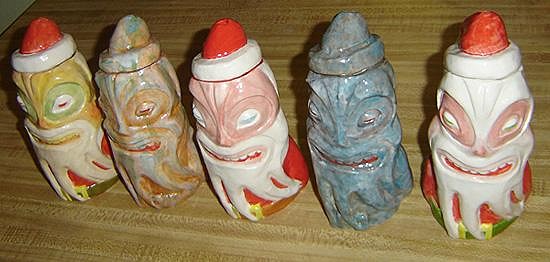
Got the first batch of "South Seas Santas" glazed. Ha - just in time for Halloween! (Well, he is a little scary.)
I'm selling a few of these on E-bay. Check the Marketplace thread. I probably won't post a how-to on this one as my mold was pretty darn ugly and the poor little guy had some pretty big part lines to remove. I'll have to slow down on the next one! |
|
B
BeezleBug
Posted
posted
on
Tue, Nov 18, 2008 4:16 PM
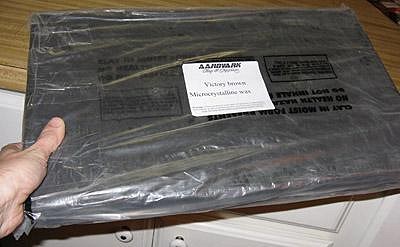
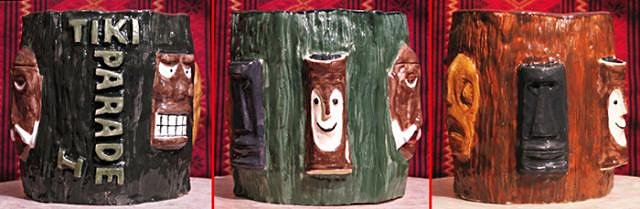
I began work on my third mug design, which I'm calling "Tiki Parade Vol. I." This will be a barrel style mug which features the faces of classic tiki mugs. More specifically, it will have little bass reliefs of Mr. Bali Hai, the Islander Smiley, Trader Vic's Suffering Bastard (sans legs and arms), Tiki Bob, Ren Clark's Severed Head (right side up), and the Islander Bumatay (head only). I figure it would be a way to own famous mugs without going completely broke obtaining them all. I decided to try sculpting wax this time around. Plasticine is great, but I can never get it to hold fine detail or super-sharp corners. The local ceramics place in Las Vegas had 10.5 lb. slabs of "Victory Brown" microcrystalline wax for a reasonable $20. Microcrystalline wax differs from common waxes in that it has extremely small crystals. This makes the wax strong, yet suitably plaiable when warm. "Victory Brown" is a grade often used for maquettes and other small character sculptures. I read somewhere that it got its name in World War II. It certainly sounds like a patriotic wax!
I started by printing out reference photos from Ooga-Mooga. I chiseled off a few chunks of the wax and warmed them up in an spare microwave. When warn, the wax is very maliable. I used an old Gatorade powder container as the base. Once the basic features of the first face (Mr. Bali Hai) were roughed in, I cooled the sculpt by setting it in the freezer.
You can heat, re-heat, and cool the wax as many times as you want. When the wax is cold, you can carve it and, to some degree, sand it. To smooth out the cool wax even further, you can apply mineral oil. My regular clay sculpting tools worked fine, although I see why some model makers will use dental tools when working with wax. Not only are dental tools sharper, but they can be quickly heated to melt the wax in small areas. The faces on my mug will run 2" high, so sharp tools are a must.
I would be curious to hear what other types or grades of wax are used in tiki mug making. Any wax sculptors out there? Tiki Farm guys? |
|
LLT
little lost tiki
Posted
posted
on
Tue, Nov 18, 2008 4:26 PM
contact Squid Great to see the fever is still in your veins |
|
M
MadDogMike
Posted
posted
on
Tue, Nov 18, 2008 8:59 PM
Way cool! |
|
B
BeezleBug
Posted
posted
on
Wed, Dec 17, 2008 8:32 PM
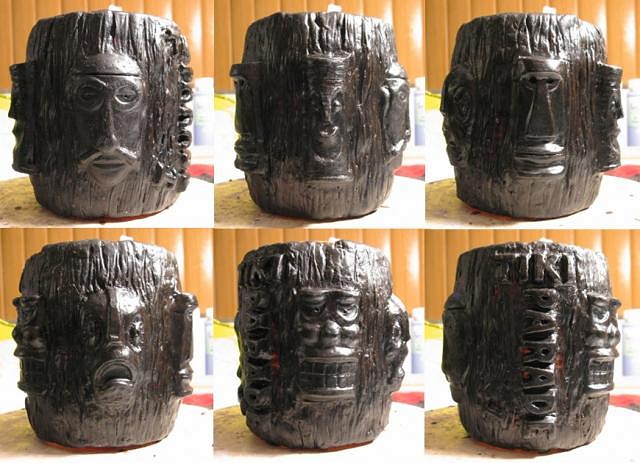
In between all the other holiday fun, I managed to finish the wax sculpt for the "Tiki Parade" mug. Clockwise, from top left, there's the visage of Mr. Bali Hai, Tiki Bob, the Suffering Bastard, the mug title, the Islander Smiley, and the Islander Bumatay. I won't have a chance to make a mold until January. I'm very curious how it will cast...
Here are my new favorite tools:
I bought a set of cheap metal dental picks from Dick Blick. Now I can carve wax and do some self-surgery on the side! As an aside, Las Vegas is in the midst of a freak snow storm - the worst since the late 50's. We've had around 3 inches of snow today - enough to build a snowman. He may not be Tiki, but he's happy to be alive!
|
|
M
MadDogMike
Posted
posted
on
Wed, Dec 17, 2008 8:42 PM
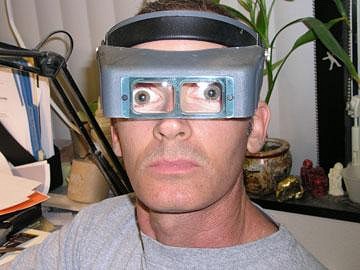
Nice detail for such small sculptures! Check out Bowana's googles |
|
B
BeezleBug
Posted
posted
on
Wed, Dec 17, 2008 10:14 PM
Those are pretty sweet...although I fear if I look at them too long I will fall under a hypnotic spell. |
|
B
BeezleBug
Posted
posted
on
Sun, Feb 8, 2009 10:12 AM
Gosh...I haven't posted in ages. Well, it's great to see all the stellar work showing up in "Other Crafts." I managed to finish the mold for "Tiki Parade I." It's a 7-piece trapezoidal beast...
Sigh - I'll never win any awards for "most beautiful mold." Cast the first 6 mugs -
I'm pretty happy with the amount of detail that survived the faces -
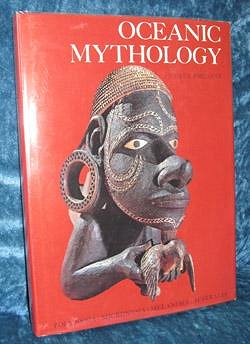
The plan is to cast 16, and sell 10 to the public. Although it will be some time before I'm finished with this mug, I figure my following design will be based on something from this book I picked up at used bookstore in Glendale, CA:
|
|
M
MadDogMike
Posted
posted
on
Mon, Feb 9, 2009 5:55 AM
Congratulations on the successful mold and the book find. I have a finished sculpt that I haven't molded because it will require a 5 or 6 part mold. One of these days I'll get the energy and courage :) The casts look great. |
|
B
BeezleBug
Posted
posted
on
Mon, Feb 9, 2009 11:22 PM
Thanks, Mike. I did figure out one trick this time when prepping for the mold pours. When making the various walls around the sections to be cast, I cut pieces of matte board and wrapped the pieces in aluminum foil. I found it quicker and easier to do than building all the walls out of clay. I had the whole thing in a wooden box, so I could stuff packing foam between the matte walls and the outer wooden box to give the matte walls support. I'll have to take some pictures of the process next time... |
|
S

Sneakytiki
Posted
posted
on
Tue, Feb 10, 2009 1:44 AM
Very professional work! |
|
M
MadDogMike
Posted
posted
on
Tue, Feb 10, 2009 6:59 AM
I like that foamboard and foil trick, the foil will release easily from the plaster and the rigid foamboard will give nice clean sections |
|
B
BeezleBug
Posted
posted
on
Wed, Apr 22, 2009 6:34 PM
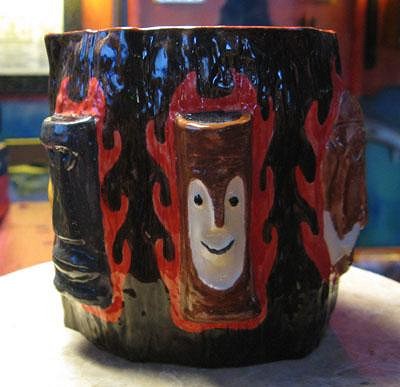
After much dilly-dallying, I finally glazed the first three Tiki Parade I mugs. Here's a gander:
The leftmost mug will be up for sale on E-bay in the next hour or so. |
|
RH
Robb Hamel
Posted
posted
on
Thu, Apr 23, 2009 6:02 AM
Tiki Carver is extremely cool. Thanks for the "Making Of" pics. Welcome to the team. |
|
B
BeezleBug
Posted
posted
on
Fri, Aug 21, 2009 4:35 PM
Yay - two more "Tiki Parade I" mugs back from firing... These have extra-deluxe glaze jobs that took forever to paint... They're on E-Bay as I write this...
[ Edited by: BeezleBug 2009-08-21 16:38 ] |
|
M
MadDogMike
Posted
posted
on
Fri, Aug 21, 2009 10:49 PM
Beezlebug, it's good to have you back! Keep up the good work and post more often :lol: |
|
B
BeezleBug
Posted
posted
on
Fri, Aug 21, 2009 11:02 PM
I know - all sorts of non-Tiki things are taking up my time this year... Nice signature banner, by the way! [ Edited by: BeezleBug 2009-08-21 23:03 ] |
|
M

Meheadhunter
Posted
posted
on
Sat, Aug 22, 2009 9:09 AM
Cool mugs.... |
|
B
BeezleBug
Posted
posted
on
Sat, Nov 28, 2009 10:35 PM
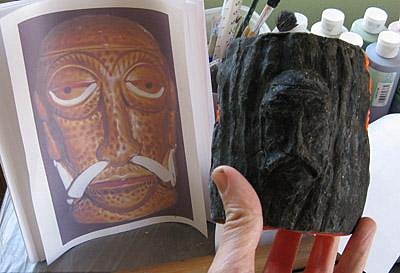
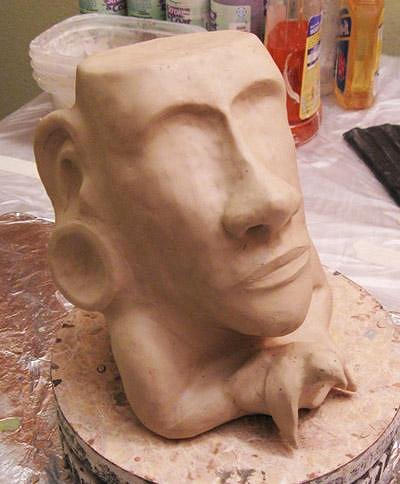
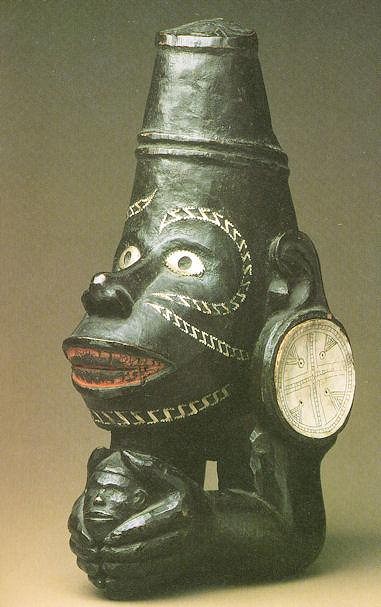
Finally moving on to my 4th mug design. Here's a rough sculpt in Klean Klay (still missing the eyes and other detail):
It's loosely based on the cover from this book:
For all you anthropologists out there, it's the protector spirit prow ornament from a canoe that treaded the Maravo Lagoon in New Georgia, Solomon Islands. [ Edited by: BeezleBug 2009-12-09 16:49 ] |
|
M
MadDogMike
Posted
posted
on
Sun, Nov 29, 2009 7:58 AM
NO WAY!!!!! :o I've been wanting to do one of those as a mug every since I saw one at the San Diego Museum of Art in August. YESTERDAY I was on ooga-mooga.com searching for "Solomon","canoe","prow", and "nguzu nguzu" just to make sure it had not already been done! I snooze, I loose :lol: :lol: :lol: :lol: :lol: Beautiful sculpt BeezleBug, glad to see you posting again :) |
|
T

teaKEY
Posted
posted
on
Sun, Nov 29, 2009 8:07 AM
My Dad probably did the first mug of this nature I think it was back in 06. I would have to check if I could show the pics |
|
T
teaKEY
Posted
posted
on
Sun, Nov 29, 2009 8:10 AM
But I really like what I see with what you got |
|
B
BeezleBug
Posted
posted
on
Mon, Nov 30, 2009 11:13 AM
The original prow carving is so nicely done that I couldn't resist making a mug in its image. Plus, I like the challenge of making tricky slip-cast molds. (There's a gap between the bird in hand and the body, plus it's going to be twice as big as my other mugs.) No doubt, I've been equally influenced by all the other mug makers out there. Any time I see a cool mug, I use it as inspiration to try to improve my own work. It's funny, I've been thinking of making Tiki earrings for a while, but have been procrastinating. Now I see that another forum member has made some really cool ones along the lines that I had been thinking of. Oh well... MadDogMike, your clay work and glaze work has really progressed nicely! That's where I need a lot more practice - the glazing part of the whole process. I really need to buy a kiln some day. [ Edited by: BeezleBug 2009-11-30 11:32 ] |
|
M
MadDogMike
Posted
posted
on
Mon, Nov 30, 2009 12:16 PM
Thanks BeezleBug. Those prows are such cool imagery, both the shape and the distictive "z" patterns used for decoration. Potential for some mixed media/shell inlay for the earrings too. I'd like to see what TeaKEY's dad came up with. I'll have to make me one someday, I like this design that BigBroTiki posted in one of the other forums:
It would make a cool lidded mug, but for now I'm moving on to something else :) After 50 years of tiki mug history, seems like it should become harder to come up with something that hasn't already. When I started, I made a couple of mugs I thought were original. Turns out they had already been done several times :blush: Now I try to do a little more research before I make something :D |
|
B
BeezleBug
Posted
posted
on
Mon, Nov 30, 2009 8:21 PM
That's a cool variation. I like how he looks like he's standing on his hands. Well, I'll probably do a small run of 6 on the new mug so the market won't be too flooded with prow protectors ;^) |
|
B
BeezleBug
Posted
posted
on
Sun, Dec 6, 2009 10:47 PM
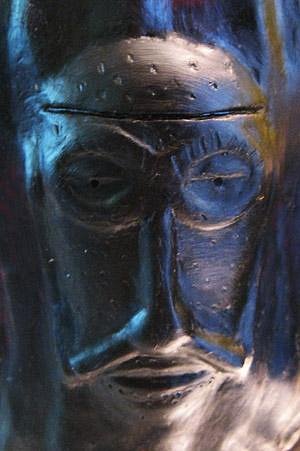
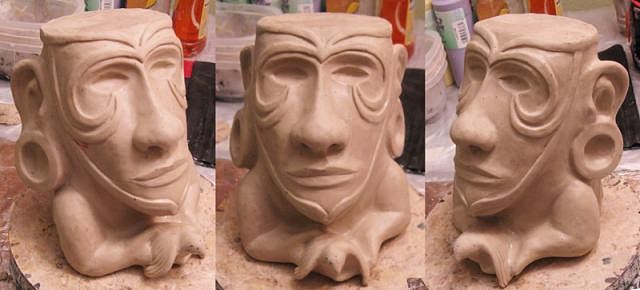
Here's the final sculpt...ready for some mold-making... The eye sockets are empty as I thought I would inlay another material for the irises at the end. All the little Zs carried by the original carving will be replicated in the glaze...
|
|
M
MadDogMike
Posted
posted
on
Mon, Dec 7, 2009 7:11 AM
Awesome, good luck with the molding process - can't wait to see the finished product. |
|
T

Tobor64
Posted
posted
on
Mon, Dec 7, 2009 7:24 AM
Ditto that. Looks great! |
|
G

GROG
Posted
posted
on
Mon, Dec 7, 2009 10:59 AM
Good job. Good luck with the molding and casting. |
|
B
BeezleBug
Posted
posted
on
Wed, Dec 9, 2009 4:20 PM
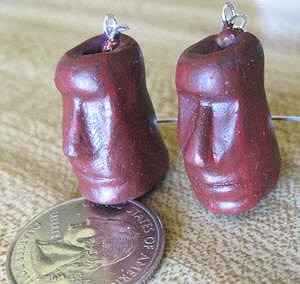
Thanks everyone... I took a slight detour to make the misses a pair of earrings. Nothing new, but fun to try. They're made out of Sculpey III and painted with some old Testor's model paint.
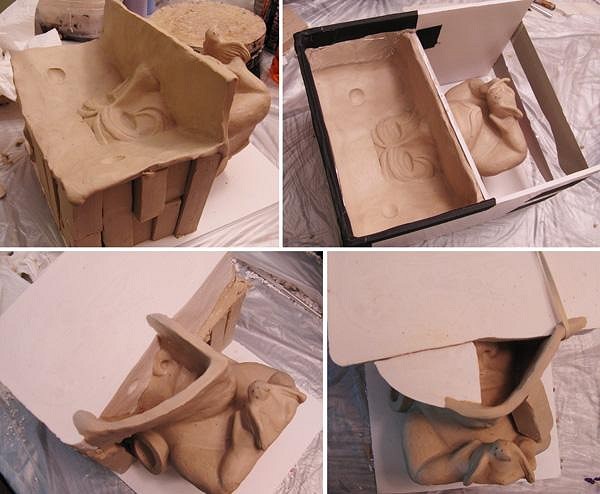
Here are the first steps of the new mug mold pour...
I figure this mug needs a name, so I'm calling him "Solomon." |
|
M
MadDogMike
Posted
posted
on
Wed, Dec 9, 2009 4:32 PM
"Solomon", that's very wise name. That's also a buttload of clay to make that mold! :o |
|
P

pdrake
Posted
posted
on
Wed, Dec 9, 2009 4:43 PM
that's pretty cool. we should hook up sometime. i enjoy going out to boulder city once in awhile and having breakfast at the coffee cup and a few nice beer's at milo's. |
|
B
BeezleBug
Posted
posted
on
Wed, Dec 9, 2009 4:48 PM
Actually, it was one-half cubic buttload - which was all the Klean Klay I had. Once the plaster was set, I pulled out most of it to be used in the future elsewhere. I love Klean Klay. It has just the right consistency and comes in those cool extruded square pylon 4-pack thingees. Note that I switched to foamcore for the outer walls. The parts touching the plaster are covered with aluminum foil. |
|
B
BeezleBug
Posted
posted
on
Wed, Dec 9, 2009 4:54 PM
PDrake - Sure, I'd be up for a drink at the Brew Pub sometime...maybe even Frankie's... |
|
B
Babalu
Posted
posted
on
Wed, Dec 9, 2009 5:07 PM
Hey looking Great Beezle! Wow! I wanta come for a drink too... |
|
M
MadDogMike
Posted
posted
on
Wed, Dec 9, 2009 5:24 PM
I made my last few molds with foam board and duct tape :lol: I didn't even line it with foil, it comes off fine. (even if a little paper stays on the plaster, it comes off when everything is dry) |