Pages: 1 23 replies
|
F

Fugu
Posted
posted
on
Sun, Apr 13, 2008 10:54 AM
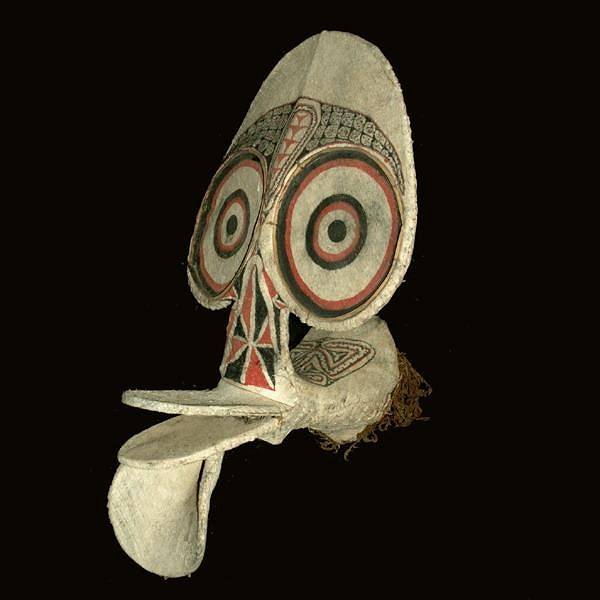
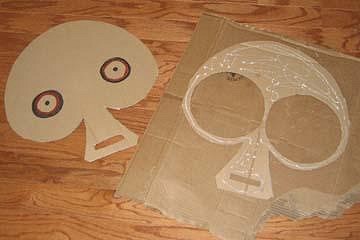
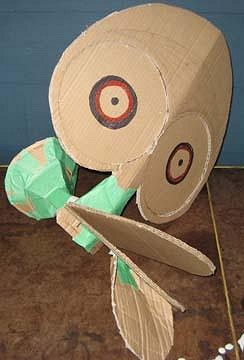
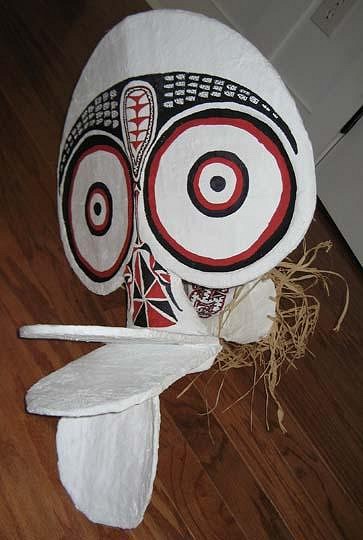
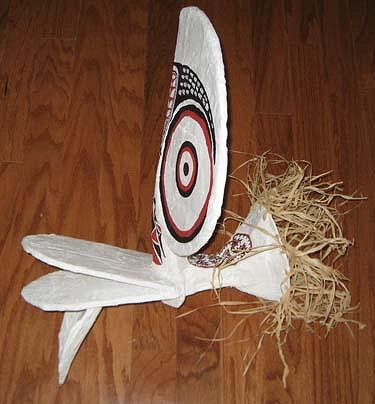
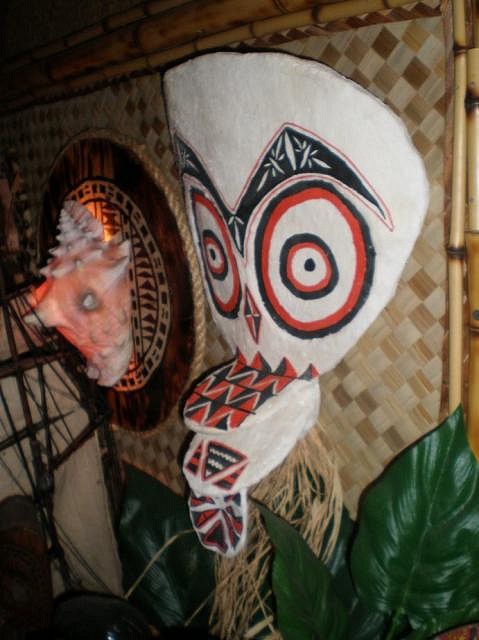
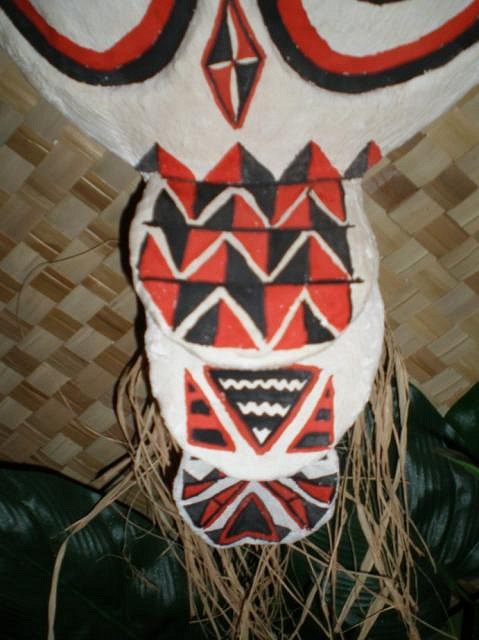
I don't know how to carve wood, so I was looking for some sort of oceanic artifact that would translate well (i.e. look semi authentic) as papier mache. I found a picture of masks from the Baining Society in New Britain and thought they would be perfect. The original masks are made out of cane and tapa, so they already kind of have a papier mache look to them. I actually made mine out of cardboard and those strips of plaster coated gauze because I thought that would simulate the tapa look a little better than papier mache. Pictures of the construction and final product are below. The first one (more yellow looking one) is the original. The rest of the photos are of my reproduction and the building process. I was pretty pleased with how it turned out, and it was a pretty cheap project too. Good for tiki on a budget (less than $20). I haven't quite decided if I want to try to make it look more yellow and aged. It would definitely look more authentic that way, but I don't really know the best way to do that. If anyone has any suggestions please let me know. The Original: My copy: [ Edited by: Fugu 2008-07-20 21:48 ] |
|
O

OceaOtica
Posted
posted
on
Sun, Apr 13, 2008 12:04 PM
nice work man! are you going to do a brownish age wash patina over it? really cool, sounds like a project we should all try to do. really great! |
|
F
Fugu
Posted
posted
on
Sun, Apr 13, 2008 1:14 PM
Thanks a lot, OceaOtica! It was easy- everyone should definitely make one. There are several websites that show all sorts of different designs for these masks. As far as the age wash goes, I would really like to do that, but am not sure how (I've never tried to do that before). I should have thought about that before painting on all of the patterns, but I got a little excited about how it was turning out and wanted to see what it would look like with all of the appropriate designs. Do you have any suggestions of what might work best as wash? I'm a little worried about smearing the painted parts (they were done with a combo of acrylic paints and sharpee (it was easier to do the fine lines on the back with a marker). If you have any suggestions on what might work or instructions on how to apply a wash without making a big mess, I would love to give it a try. |
|
S

Sophista-tiki
Posted
posted
on
Sun, Apr 13, 2008 1:23 PM
Thats so cool. makes me wanna try and make one. |
|
O
OceaOtica
Posted
posted
on
Sun, Apr 13, 2008 1:46 PM
Hey Fugu, Aloha kaua [ Edited by: OceaOtica 2008-04-13 13:49 ] |
|
LLT

little lost tiki
Posted
posted
on
Mon, Apr 14, 2008 8:27 AM
FUGU! |
|
C

Chongolio
Posted
posted
on
Mon, Apr 14, 2008 11:24 AM
I concur with the other heathens. This is a very cool project to get all messy with. Thanks for the post and pics. I would like to see more of this type of artistic mischief. |
|
S

Sneakytiki
Posted
posted
on
Mon, Apr 14, 2008 12:10 PM
Very cool project! I've found that coffee or black tea make the most authentic looking wash in the color range you are going for. Easiest to do if you dye the whole piece before applying the colors. When you make a red or yellow paint to put on a tribal piece, try to make the red a rust color like iron oxide, add a bit of orange and brown to a straight red, same goes for a yellow. Charcoal is usually used for black in these cultures. If you want to go to the trouble you can make your own pigments by crushing charcoal and mixing it with grease, butter, mineral oil, etc... I am way impressed by your Baining mask. Sneaks [ Edited by: Sneakytiki 2008-04-14 12:12 ] [ Edited by: Sneakytiki 2008-04-14 12:12 ] |
|
F
Fugu
Posted
posted
on
Wed, Apr 16, 2008 7:17 PM
Thanks for all of the compliments, everyone. I'm really flattered by the nice comments from such talented Tiki artists! Sneakytiki, I totally agree that the red is a little too red. It dried more red than I thought it would- it was a little more on the rusty side when I was originally applying it. It is a little hard to tell what the correct red should be for these. I haven't seen one up close, and in the pictures the red actually looks like a pretty true red (rather than an orange like I would have expected for a tribal piece.) I'm going to try to make it a little more orange this weekend as well as try out some aging techniques. If it works out, I will post some new pix afterward. If anyone is interested in making one of these, the website below includes some really great pictures of various masks. It was especially useful because it showed the masks from several different angles including the sides and back so that you could really do a reasonable reproduction. (It also has photos of other oceanic and tribal art that are pretty cool) http://artvs-internet.luise.eikona-server.de/ Fugu [ Edited by: Fugu 2008-04-16 19:26 ] |
|
F
Fugu
Posted
posted
on
Sun, Jul 20, 2008 9:58 PM
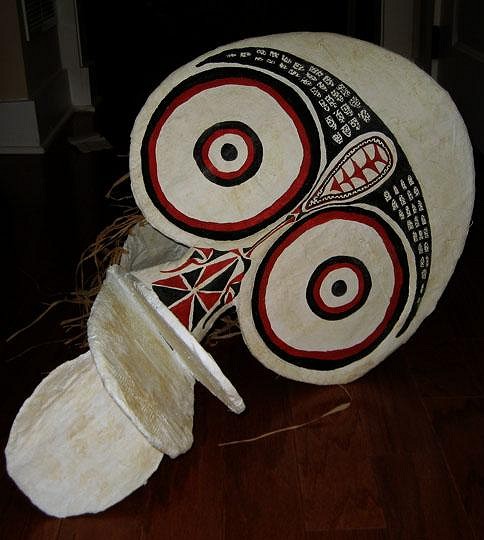
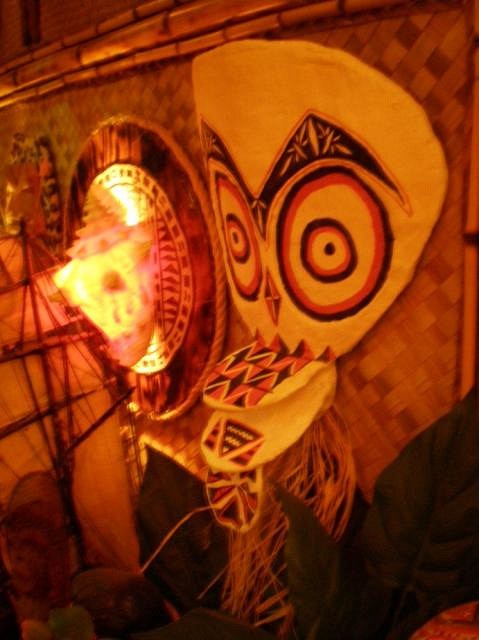
I finally got around to distressing the Baining mask with a wash of grays, ochre and brown. It looks much better now and is actually darker and more worn looking in person than in the picture (and not quite as yellow). The acrylic matte medium worked great and prevented the sharpie from smearing. THanks for the suggestion OceaOtica.
|
|
F
Fugu
Posted
posted
on
Sun, Jul 20, 2008 9:59 PM
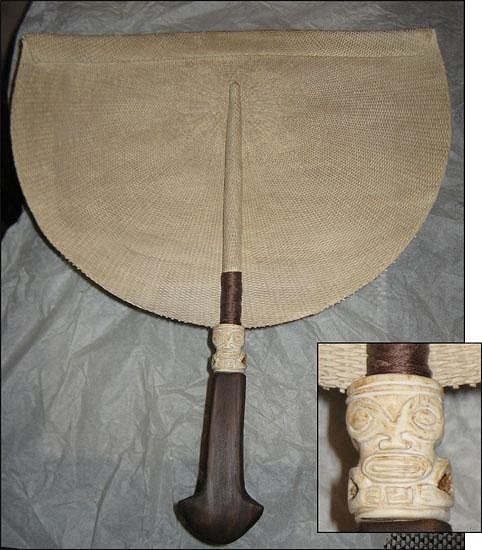
I also made a copy of a Marquesan fan this weekend.
|
|
O
OceaOtica
Posted
posted
on
Mon, Jul 21, 2008 1:08 PM
Nice work Fugu! That fan is a beaut! Glad the matte medium deal worked out for you. |
|
T

TikiMango
Posted
posted
on
Mon, Jul 21, 2008 1:19 PM
Great work. Going back to what Sneakytiki said about coffee and teas, they work great for aging things. I tend to water them down a bit, then put that into a squirt/bottle mister. |
|
M

MadDogMike
Posted
posted
on
Tue, Jul 29, 2008 9:21 PM
Beautiful work Fugu! From the wikipedia pix, it looks like these masks are huge (like 3 feet tall), it yours that big!? How do you display a piece like that? Because of it's shape, it won't hang on a wall or sit on a shelf. Maybe that's what the Bainings burned them when they were finished :) |
|
F
Fugu
Posted
posted
on
Tue, Jul 29, 2008 10:58 PM
I made mine a little smaller so that it wouldn't overwhelm the other tiki stuff. My eventual tiki room is only 10x 10, so a 3+ foot mask of this design would be a bit much I think. Mine is 24 inches from the top of the mask to the bottom of the flap that hangs off the "beak", and almost (but not quite) 24 inches from the front of the beak to the very back with the raffia. (The actual size of the original is around 38 inches). I think that these masks were meant to be temporary. I'm not sure if they burn them at the end of the dances or not. I kind remember reading that they were left out in the woods to decay, but I can't remember where I read that so I'm not sure if that is true or not. |
|
F
Fugu
Posted
posted
on
Sat, Apr 25, 2009 10:38 AM
I just finished a Solomon Islands inlaid shield that I had been working on for awhile. The square shell pieces are actually from Michaels; they had strings of them in their beading section. Seeing those in the store actually gave me the idea to make the shield. The painting is a little more distressed than it appears in the photo, so it looks a little more antique than the photo would suggest.
Some real ones can be seen in these links: [ Edited by: Fugu 2009-04-25 12:09 ] |
|
M
MadDogMike
Posted
posted
on
Sat, Apr 25, 2009 1:18 PM
Good to see you posting something again Fugu, you have cool and unusual ideas. Great job on the shield, it is wicker like the original? :) |
|
QK

Queen Kamehameha
Posted
posted
on
Sat, Apr 25, 2009 3:14 PM
Hi Fugu, the shield is quite beautiful! and using the shell beads was brilliant! great job! Amy |
|
F
Fugu
Posted
posted
on
Sun, Apr 26, 2009 7:55 AM
Amy- Thanks so much! I love looking through your backyard photos- everything in your yard is amazing. MadDogMike- Thanks for the compliment. I just made it out of wood...the wicker became too tedious to weave after awhile :o) Just kidding, although I did look around at some antique shops hoping to find an old snow shoe or something wicker-like to build the shield on. Then I decided that noone would really notice what the backing was, so I got lazy and got a piece of wood. I think I will edge it with natural fiber or something to make it look like it isn't just a slab of wood. |
|
T

teaKEY
Posted
posted
on
Sun, Apr 26, 2009 10:10 AM
That shield totally looks like the real thing. And I have admired those designs for years now. |
|
T

Tahitiki
Posted
posted
on
Thu, May 21, 2009 6:39 AM
Hey Fugu, |
|
F
Fugu
Posted
posted
on
Thu, May 21, 2009 7:43 AM
Hey Tahitiki, The fan part is actually just a woven circular placemat like the one shown below. I saw them on sale for at the World Market and they just reminded me of the woven fans that I had seen in a book. I bought two of the light tan one (the back one in the picture), folded then over so that they would be the appropriate shape, sandwiched a piece of cardboard in for support and glued the thing together. I was going to cut them to the appropriate shape, but they just unravel, so I recommend just folding (or at least folding under the cut edge to avoid unravelling). Then I darkened it up a little with some dilute brown craft paint so that it would look a little older. Super easy to do.
|
|
K

kahalakruzer
Posted
posted
on
Fri, Jan 8, 2010 10:26 PM
I love the baining mask idea! I had been wanting to make one since I saw this thread way back, so I finally got the papier mache out and went to town. Just finished the painting on the mask. I'll post some pics when I've got a chance. Thanks for the great idea Fugu! |
|
K
kahalakruzer
Posted
posted
on
Thu, Jan 14, 2010 10:27 PM
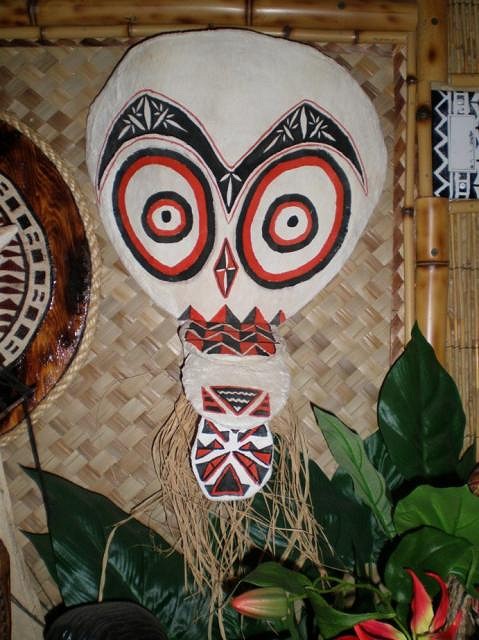
Here's some shots of the mask I made. Not nearly as detailed as the one you've got, but it got the job done for me. I also left the back part of the mask off, for ease in wall hanging, although I think it looks a lot better with the complete mask. These masks are awesome too, because there are so many different styles and variations to create. Thanks again for the inspiration Fugu! |
 ,
,  ,
,  ,
, 


Pages: 1 23 replies