Tiki Central / Home Tiki Bars
The Kona Luanii, Denver, CO
|
Z

ZuluMagoo
Posted
posted
on
Wed, Aug 10, 2005 12:51 PM
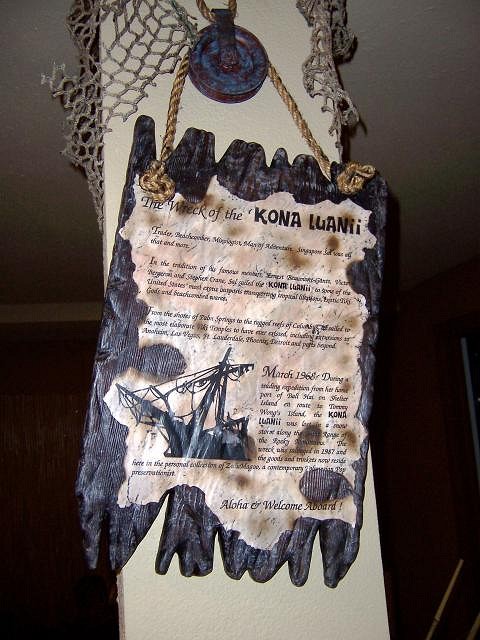
Name:The Kona Luanii Description: Obviously the text can't be read, so here's the story: The Wreck of the ‘KONA LUANII’ Trader, Beachcomber, Mixologist, Man of Adventure. Singapore Sal was all that and more. In the tradition of his famous mentors, Ernest Beaumont-Gantt, Victor Bergeron and Stephen Crane, Sal sailed the ‘KONA LUANII’ to some of the United States’ most exotic outposts transporting tropical libations, exotic Tiki Gods and beachcombed wares. From the shores of Palm Springs to the ragged reefs of Columbus, he sailed to the most elaborate Tiki Temples to have ever existed, including excursions to Anaheim, Las Vegas, Ft. Lauderdale, Phoenix, Detroit and ports beyond. March 1968. During a trading expedition from her home port of Bali Hai on Shelter Island to the Tiki Kai in Denver, Colorado, the KONA LUANII was lost in a snow storm along the Front Range of the Rocky Mountains. The wreck was salvaged in 1987 and the goods and trinkets now reside here in the personal collection of ZuluMagoo, a contemporary Polynesian Pop preservationist. Aloha & Welcome Aboard ! I think this story will tie together all of the elements that will be found in the bar. It will have a heavy nautical/shipwreck element in addition to a tiki/South Seas environment. I have started working on some of the other decor and will post pics and progress report as things progress. My wife has graciously allowed me to redo our entire finished basement as I see fit (woo hoo!). We already have a bar down built down there, so most of this project is decor. However, with a three year old daughter and a four month old daughter at home, my spare time is few and far between. I'm afraid this project may move a little slower that I would like. [ Edited by: zulumagoo 2007-06-11 14:55 ] [ Edited by: ZuluMagoo 2009-04-29 20:18 ] [ Edited by: ZuluMagoo 2009-12-29 22:48 ] [ Edited by: zulumagoo 2010-03-08 10:47 ] |
|
RND

Rum Numb Davey
Posted
posted
on
Wed, Aug 10, 2005 2:49 PM
Good stuff, ZuluMagoo..for know all I get is a couple of bookshelves and my micro bar. Once we relocate from condo to home watch out! |
|
Z
ZuluMagoo
Posted
posted
on
Thu, Aug 11, 2005 10:28 AM
Here is some of the 'cargo' decor that I made using the Dollar Store tikis discussed a while back. In fact, I stopped in the Dollar Store last week and I still found a few of these guys laying around. Using some paint stir sticks from Walmart (free) Some tomato crates I found at a garage sale (25 cents each) I ended up with a batch of salvaged cargo tikis that were on their way to exotic destinations. This set only ended up costing me only about $14 total. |
|
Z
ZuluMagoo
Posted
posted
on
Thu, Aug 11, 2005 10:41 AM
The Kona Luanii is a real place. It is an apartment complex in Anaheim, CA (Tour item #10 for those of you who have my Tiki Tour of Southern California Guide Book). This complex is only two blocks away from my grandparents house where I spent my summers growing up. That was the inspiration for the name of my bar/ship. Plus I think the font on the complex typifies Polynesian Pop culture beautifully. |
|
TT

ted tiki
Posted
posted
on
Fri, Aug 12, 2005 1:12 PM
Cool stuff. Great idea with the theme and story. I am in similar territories as I have just started my downstairs room. Mine will take years I'm afraid though. |
|
Z
ZuluMagoo
Posted
posted
on
Fri, Jul 21, 2006 9:14 PM
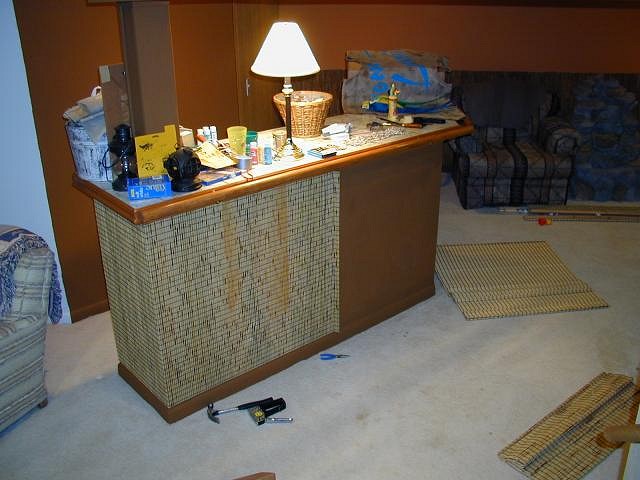
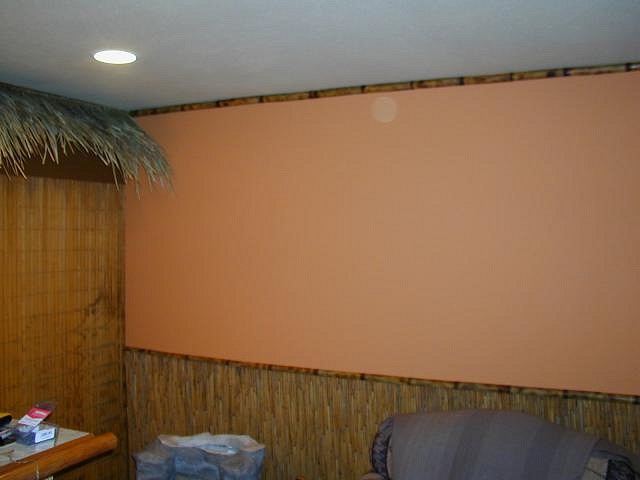
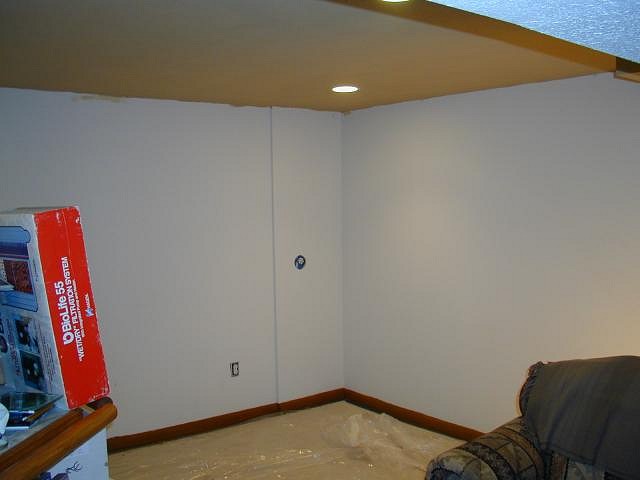
I have finally started working on the Kona Launii. But first I have a little cleaing to do. There is a basement in there somewhere. Just have to find it. Now that our 15 month old is finally starting to out grow some of this baby stuff we have been saving from our first daughter, we can finally start getting rid of some of this crap. Absolutely amazing how much baby 'stuff' we have. Have finally moved enought stuff I can start painting the wall and the ceiling. The far half of the main room (beyond the stairs) will stay non-tiki for the kids for a few more years. The other half is all mine. Getting up some ceiling paint. And the stairway down from the kitchen. Starting with some brown for background. A half and half wall along the back. The top half gets orange. The last white wall gets a dark honey gold color (hard to see in pic), but gets covered with thach anyway. It is just a background color so white does not show through. Starting to thach the back half and half wall. Again, the brown bottom half is just so white will not show through. Attaching with a staple gun and trimming around the baseboards. Attaching the larger thach (stape gun) on the yellow wall. That's what I have for now, but have finally started working it. This batch of pics encompassed a full weekend worth of work (Fri night thru Sun night) with my wife and kids out of town so I could work uninterupted. Another set of pics to follow with more progress. Zulu |
|
SF

Slacks Ferret
Posted
posted
on
Fri, Jul 21, 2006 9:46 PM
It's looking good so far. That's a nice space you have to work with. Was the bar already there when you moved in? |
|
Z
ZuluMagoo
Posted
posted
on
Fri, Jul 21, 2006 10:28 PM
It is a dry bar and it was there when we moved in. The entire basement was already finished when we bought the house a year and a half ago. The fact that I don't have to do any carpentry work down there makes the transformation into my basement paradise orders of magnitude easier. [ Edited by: ZuluMagoo 2006-07-21 22:31 ] |
|
TSW

The Sperm Whale
Posted
posted
on
Fri, Jul 21, 2006 10:44 PM
That is really cool!!! I love progress pic's!!! Thank you for sharing and I hope to see more soon!!! |
|
MR

Matt Reese
Posted
posted
on
Sun, Aug 6, 2006 8:36 PM
Well? Where are the new pics? I've got the jones. |
|
L

LavaLounger
Posted
posted
on
Mon, Aug 28, 2006 10:52 AM
Hey! What a terrific idea Zulu!!! I may try that! When I saw those ugly horrible little tikis for a dollar each at the dollar store.....I bought them all. They've been snoozing in heap ever since. (I'm glad they finally stopped talking to me.) Anyone else got any clever ideas of how to display them, other than nooses around their necks hanging from the ceiling?? I bought about 20. LavaLounger |
|
Z
ZuluMagoo
Posted
posted
on
Thu, Aug 31, 2006 10:18 PM
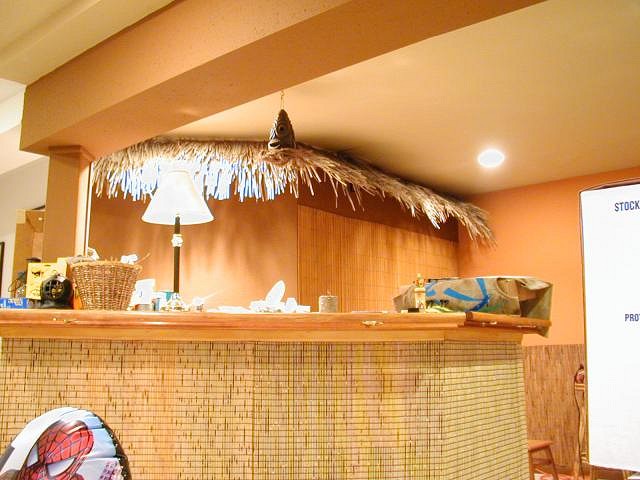
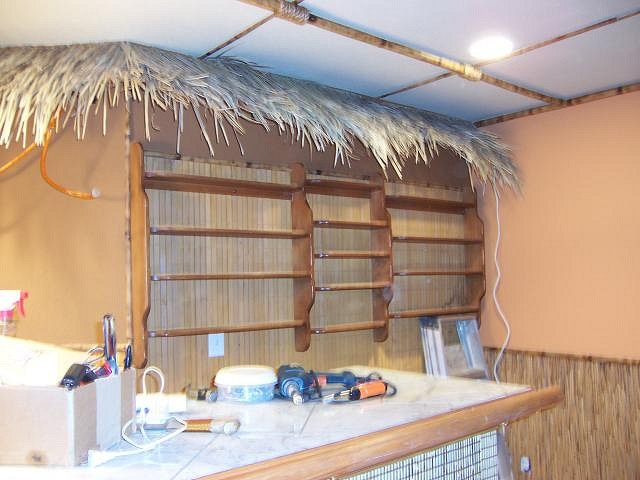
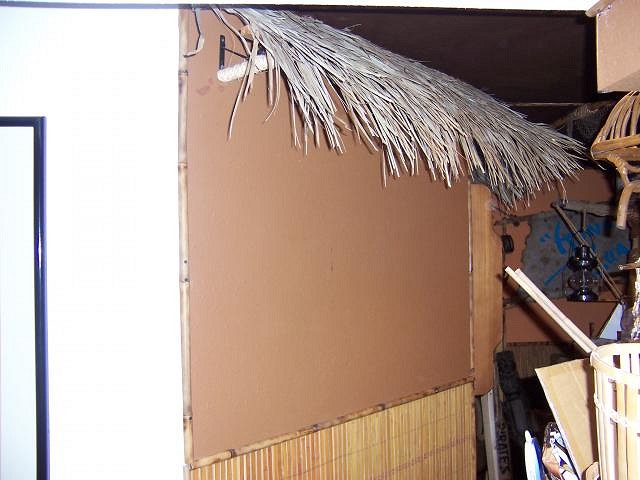
Work continues slowly but steady. I put some trimmed bamboo blinds along the front of the bar.
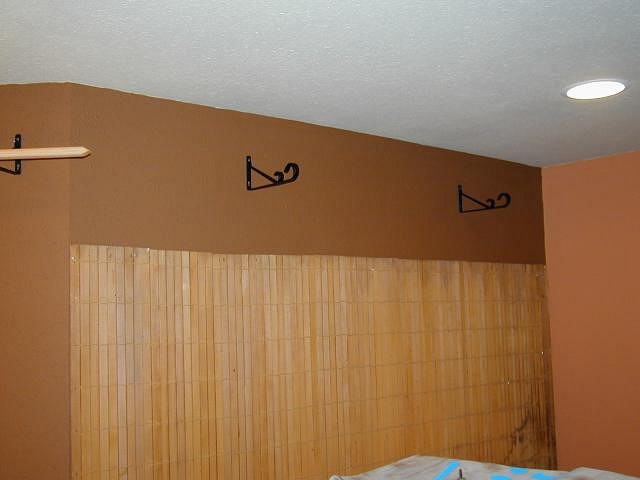
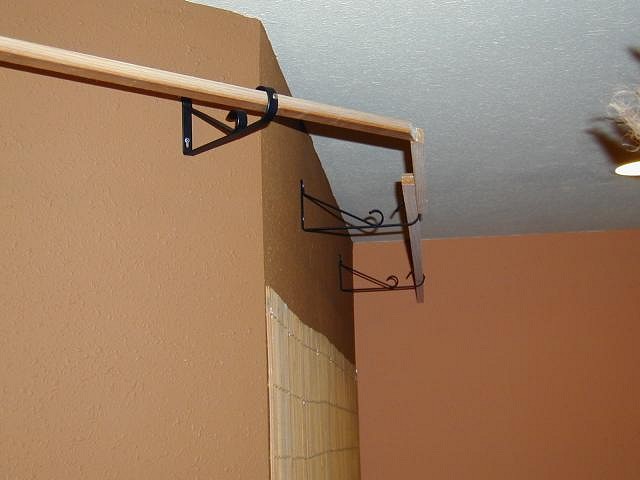
Then I started on a thach roof behind the bar itself. I mounted a few off-the-wall plant hangars near the top of the wall.
Drilled a hole thru the front of the hangar and screwed lightweight 1/2" x 1/2" square garden stakes into place.
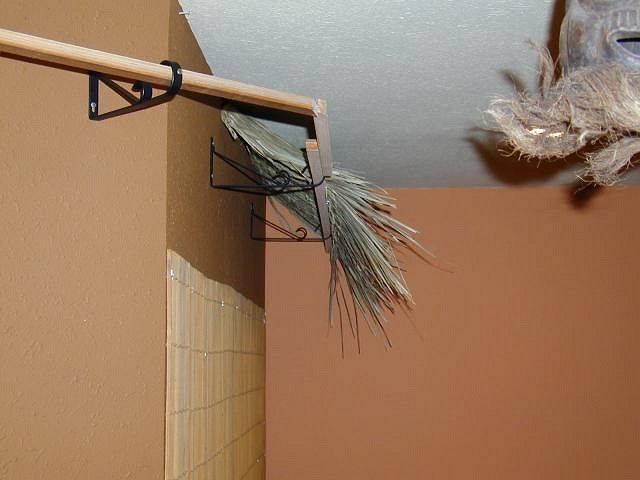
I used a staple gun to attach the top of the thach to the wall and then also stapled the bottom to the garden stake.
Thach roof line complete.
I picked up my bamboo poles today. I'll start placing trim this long holiday weekend. |
|
Z
ZuluMagoo
Posted
posted
on
Tue, Sep 5, 2006 1:18 PM
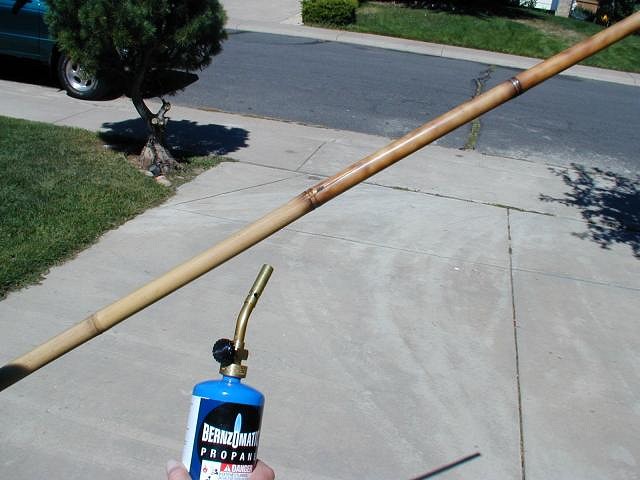
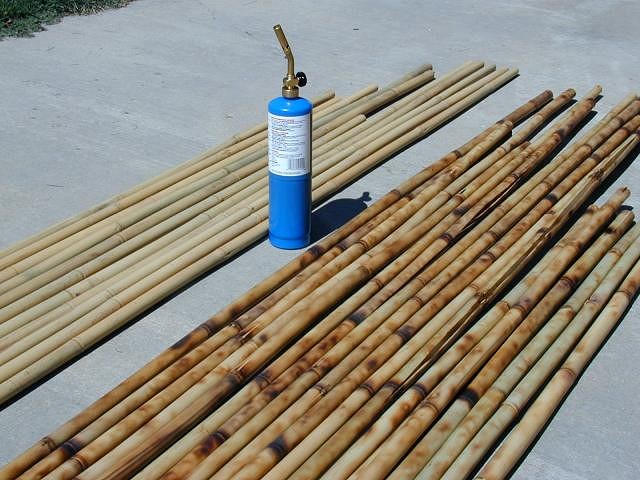
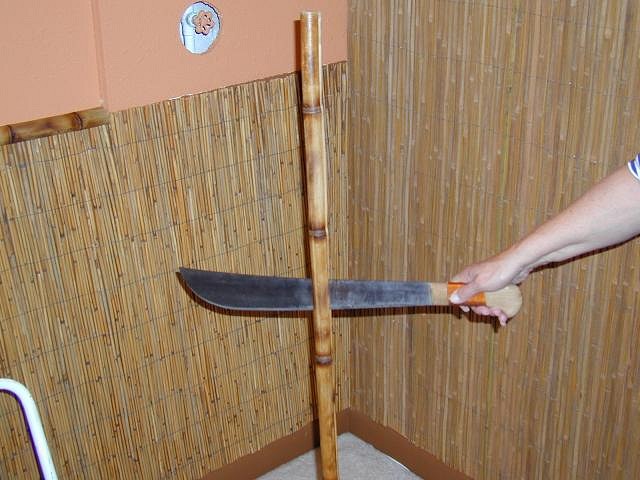
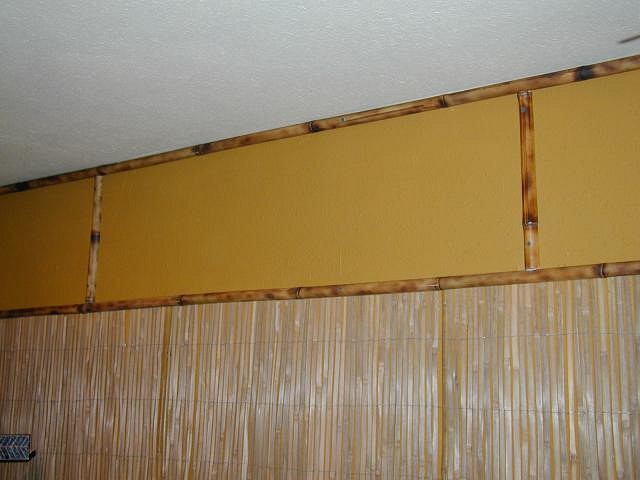
I started working with the bamboo trim last weekend. When I got all of the poles home, I remembered a tip that Bamboo Ben posted quite a while back about 'enchacing' the poles with a handheld propane torch. So I went down to the local Walmart and bought a $12 torch and started experimenting. Here is a pole, half treated, half untreated. Here you can clearly see the difference in the poles. I really liked the treated look, so I finished off all of my poles. Note - treating the poles requires a big time investment. It took nearly 18 man-hours to finish approximately 40 1" diameter poles (8' to 12' in length). Several of the poles required that they be spilt to mount on the wall as trim. For the poles that were not already cracked, I cut the end with a handsaw and then pushed a machette down the length of the pole. Some of the nodes were quite strong, so I just wacked the machette 2 or 3 times with a hammer. Not all of the poles evenly split into halves. But when mounted on the wall, I couldn't tell the difference and it also made each pole a little more individual so they would not all look the same. Mounting the split poles was very easy once I found a system. I pre-drilled a hole in the split pole to keep it from cracking, then using 2" drywall screws and a stud finder, I screwed the pole into place on the wall into the wooden studs. I only needed 2 to 3 screws for each pole to secure them in place.
Work continues with more trim then the ceiling poles. [ Edited by: zulumagoo 2006-09-05 19:48 ] |
|
Z
ZuluMagoo
Posted
posted
on
Fri, Sep 15, 2006 10:31 AM
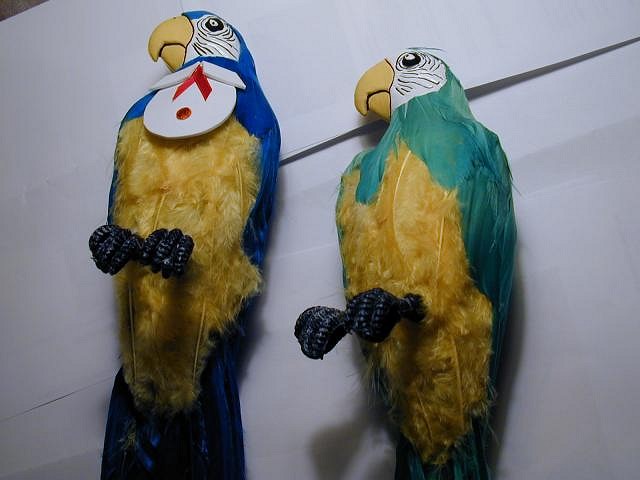
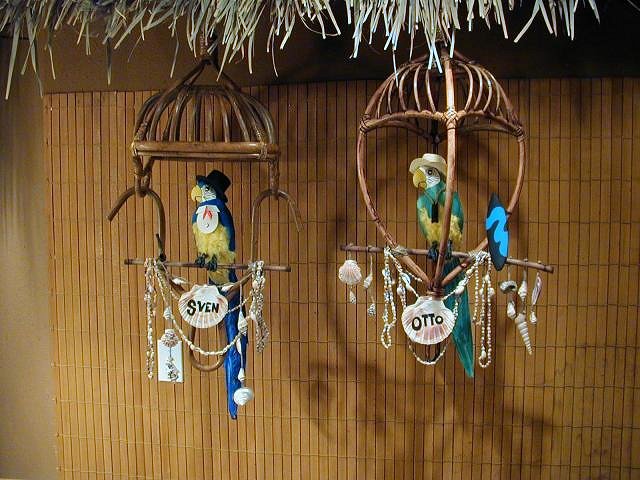
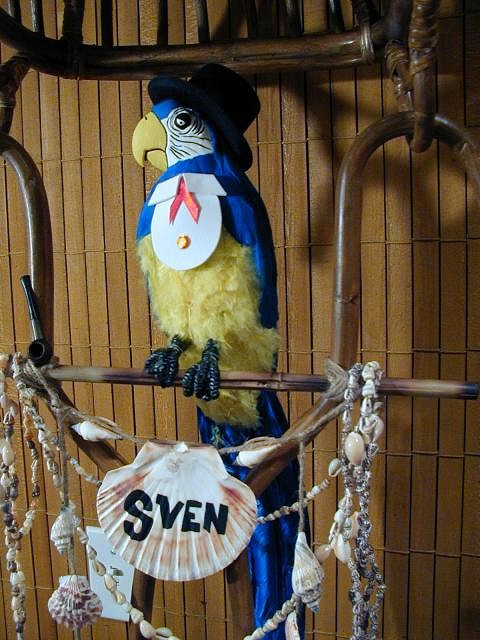
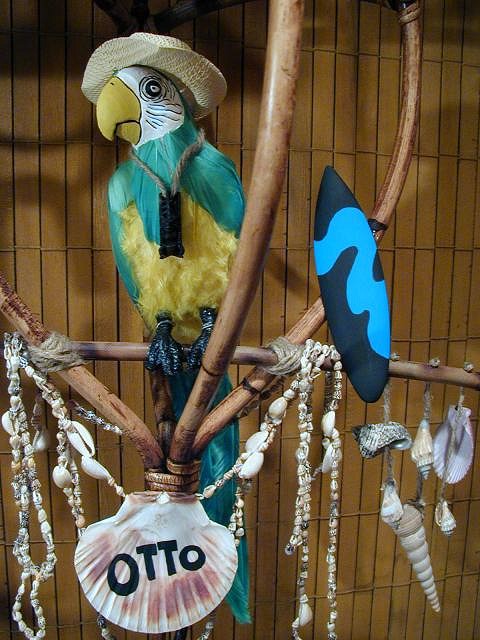
Last week I took a break from the room treatments and did something else for a change. When Disney released Kevin and Jody's replica Enchanted Tiki Room Barker Bird, it inspired me. I loved the drummer, and purchased one, but wanted to come up with something of my own for the birds. So I started with two feathered plastic parrots from Party City. There were in rough shape when I got them home. So I trimmed up the feathers and repainted their faces and their beaks.
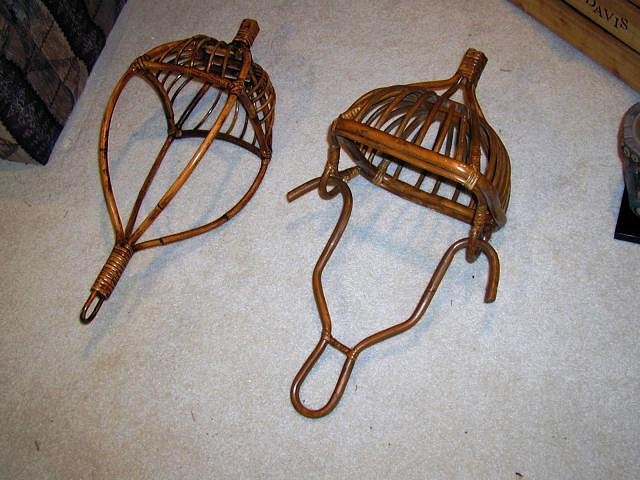
Earlier this summer I found these two ratan plant hangars at a garage sale. If you turn them upside down, they make great bird perches.
Then using odd scraps of bamboo and seashells I came up with my own tiki room birds. But instead of naming them Jose, Fritz, etc., I named them in tribute to a couple of fellows responsible for the Poly Pop revival.
|
|
TF

Tiki Fink
Posted
posted
on
Fri, Sep 15, 2006 12:24 PM
Lookin' good!!!!!!! |
|
W

WooHooWahine
Posted
posted
on
Fri, Sep 15, 2006 7:26 PM
WoooHooooo! I love the birds!!! I need them for my Tiki Classroom :) |
|
S

smgleason47
Posted
posted
on
Sat, Sep 16, 2006 11:43 AM
This place looks great. I love how you utilize inexpensive items to pull off very expensive looking decor. Great creativity - you are inspiring me. |
|
I

IsleConch
Posted
posted
on
Sat, Sep 16, 2006 9:08 PM
Just marvelous...so much creation makes me wanna start something. |
|
E

exotica59
Posted
posted
on
Sun, Sep 17, 2006 8:02 PM
Your bar is so great! I love the birds. |
|
MD

Mr. Dale
Posted
posted
on
Wed, Sep 20, 2006 11:25 AM
Party at Zulus!!!!!!! |
|
Z
ZuluMagoo
Posted
posted
on
Mon, Nov 6, 2006 5:13 PM
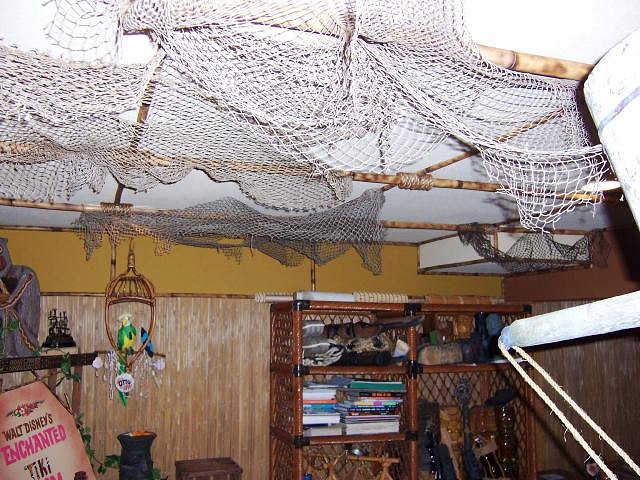
I got a little more work done last weekend. I found this set of shelves at the Goodwill for $10 (heavy as a b#$@tch) but will make a good home for my mugs.
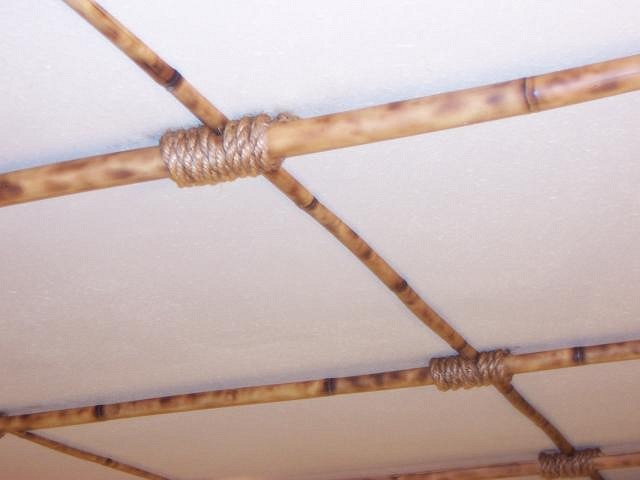
I also got some bamboo poles up on the ceiling. I mounted 1/2 rounds flat against the ceiling and screwed them into the dry wall/bottom of the floor joists. Then I mounted full poles over the 1/2 rounds and screwed them into place.
I painted the ceiling a tan color but it washes out with a flash from the camera. I wish I would have painted it a little darker, but too late now, moving on... I finished off the ceiling poles with a 1/2 diameter rope wrap.
|
|
V

VampiressRN
Posted
posted
on
Sun, Dec 3, 2006 2:19 PM
Wow...this is going to be quite a place when you get done. You are lucky to have such a large area to work with. Very ingenious use of materials. Keep those pictures coming. GREAT JOB!!! |
|
Z
ZuluMagoo
Posted
posted
on
Thu, Dec 28, 2006 10:09 PM
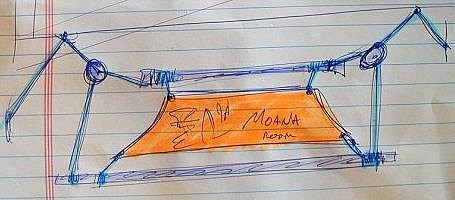
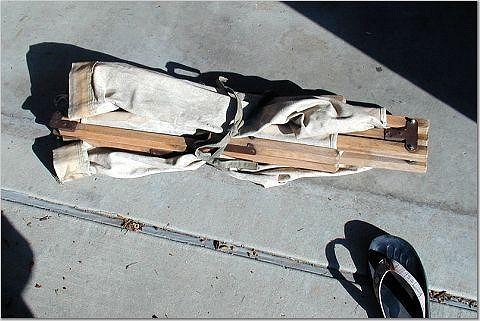
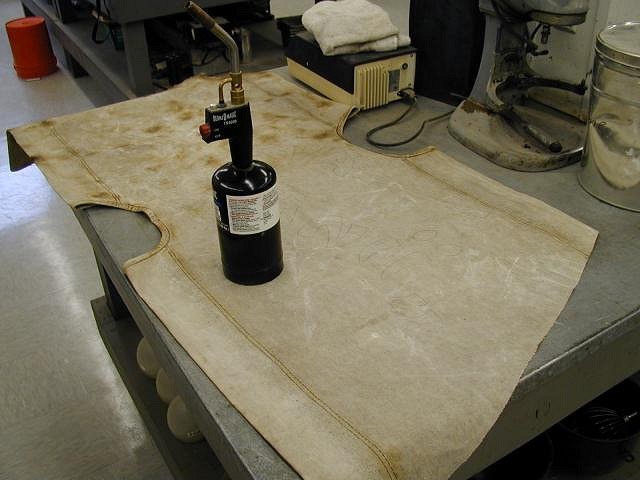
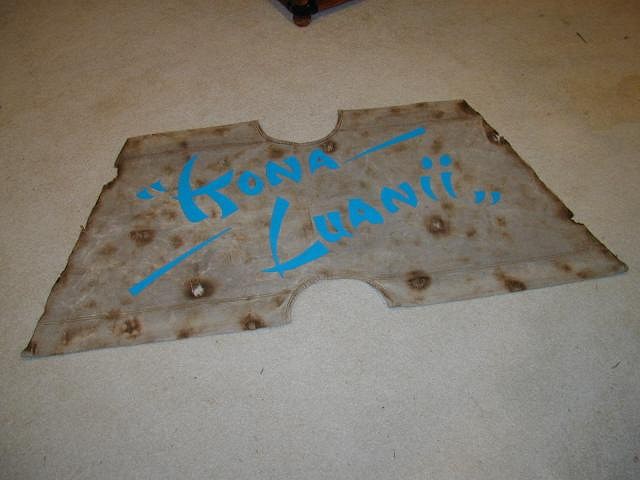
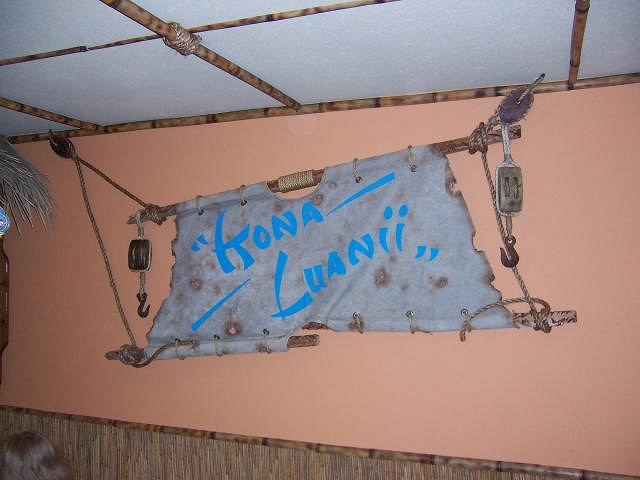
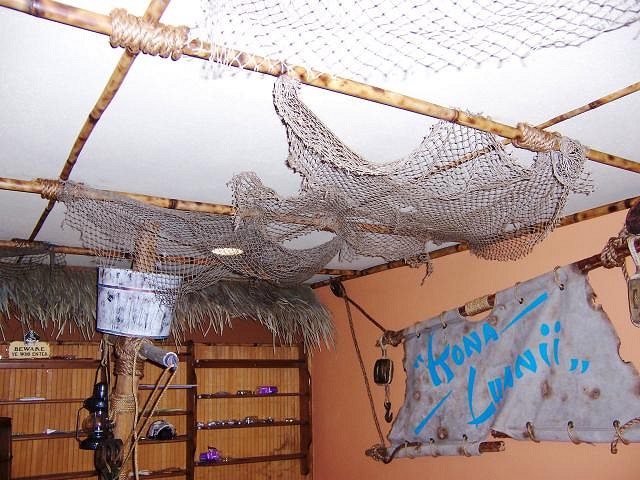
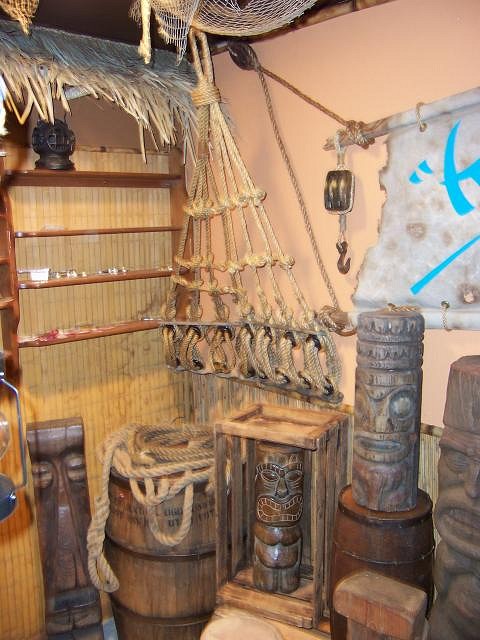
I have finished some of the nautical elements that I wanted to incorporate into my space, including a sail from the Kona Luanii and a crows nest. I had to build both of these items from scratch, but that was the fun part. First, the sail. I drew up a quick 15 second concept sketch so I had something to start working with. Then I started hunting for materials. I found this old army cot a a garage sale this summer for 2 bucks. The heavy cotton canvas was exactly what I was looking for. I took it home and removed the canvas and pitched the rest. I cut the shape of a sail and got out my old friend the blow torch (a great tool I have discovered for aging and distressing all types of materials).
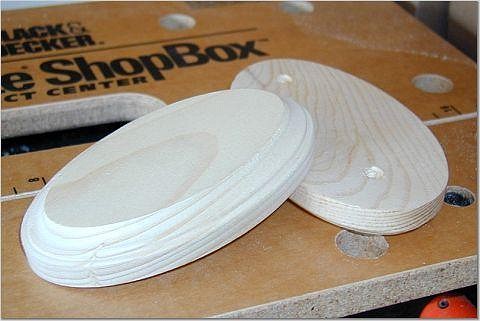
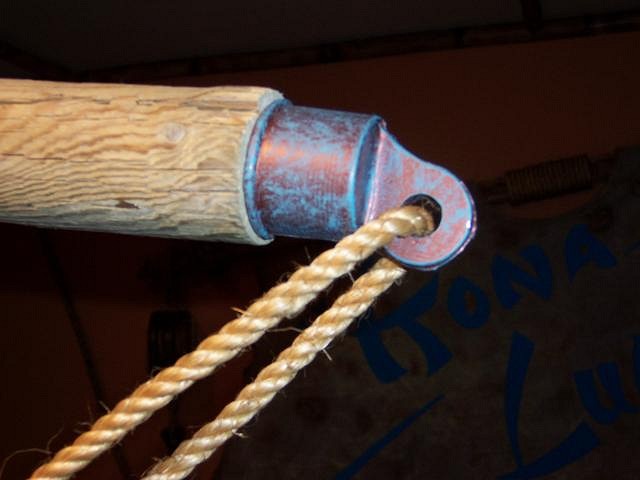
Then I transfered the Kona Luanii name/font onto the canvas and painted it with standard water based acrylic paint (Walmart $0.88 in the craft dept.) I need some nautical looking hardware for the rigging, which is difficult to find here in Denver, but of course can be very easily home made to look pretty convincing. I picked up several of these little wooden plaques for $0.40 or $0.50 each (I don't remember where, either Walmart or Hobby Lobby). Screw them together backwards and stain them.
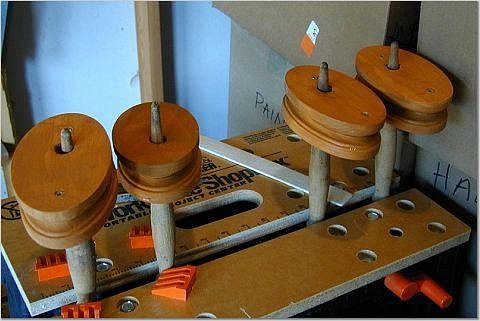
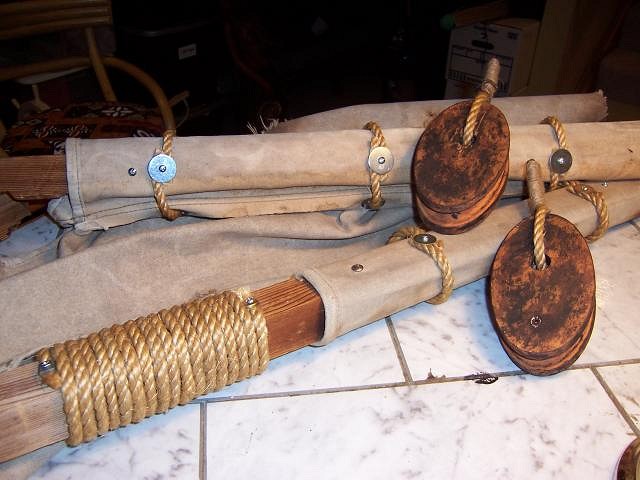
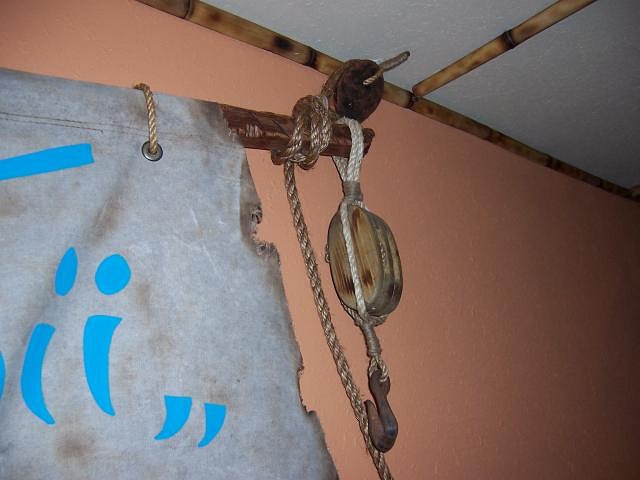
Then I added some paint to distress and age them. I also added gromets to the sail canvas along with various decorative rope. Now it is ready to hang on the wall. I added some additional decorative elements. Hooks that I found at garage/estate sales and I got the pulleys at Hobby Lobby for $2.99 each when they were clearing out their summer decor items.
I think this sail only cost me about $12 in materials, BUT, the trade off is the time spent to create it. Worth it I think, I enjoy the creating part. |
|
Z
ZuluMagoo
Posted
posted
on
Thu, Dec 28, 2006 10:38 PM
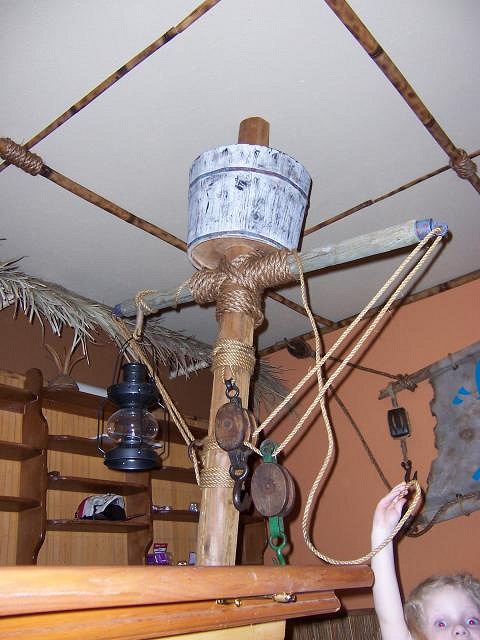
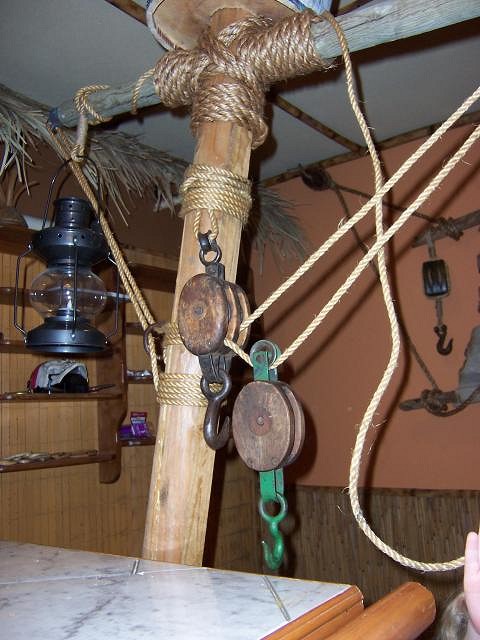
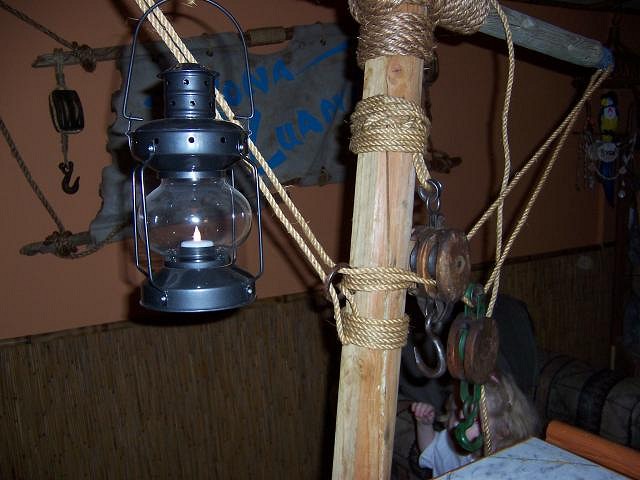
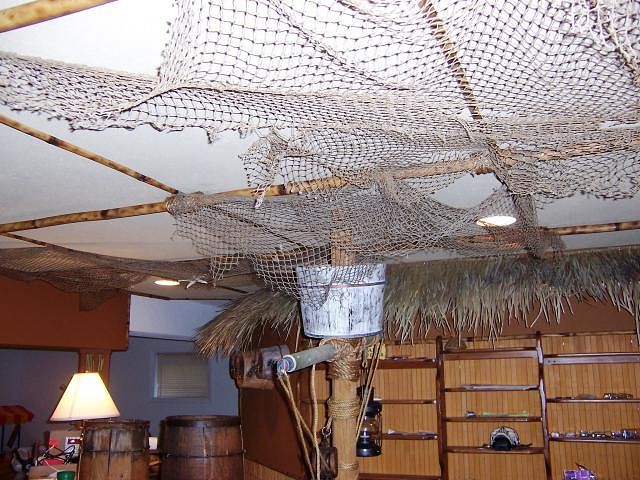
The Crow's Nest. It is mounted to the end of the bar. I picked up two different pieces of landscaping stakes at Lowes and drilled a 2" hole in the larger one and slipped the smaller one thru and set a couple of screws to hold it in place. I added more decorative rope at the junction. For a while, before I got the decorative items on the mast, it looked like I was building a crucifix in my basement. I cut a hole in a wooden bucket I picked up at Big Lots and slipped it over the top. To help hold the mast in place, I drilled a hole in the end of the larger timber and installed a dowel, then drilled a hole in the ceiling for the dowel to fit into. I found these perfect end caps at Home Depot for $0.68 each. They are end caps for metal poles used for chain link fences. I just painted and distressed them and they they are perfect. More decorative rope and various 'junk' collected from garage/estate sales. Side note, when I hit an estate sale, the garage is always the first place I go, I always find this kind of stuff in there (rope, hooks, pulleys, barrels, etc.) I got two of these lanterns at Big Lots (can't find the other one%$!!) to hang on the ends. I also found these great flicker candle lights at the dollar store. They are battery operated and last for 60 hours. The flicker looks really great in low light.
Making progress..... [ Edited by: ZuluMagoo 2006-12-28 22:43 ] |
|
P

Paipo
Posted
posted
on
Fri, Dec 29, 2006 12:58 AM
Tiki DIY at its finest...that sail sign is a masterpiece! |
|
B

bigbrotiki
Posted
posted
on
Fri, Dec 29, 2006 5:48 AM
Somebody hire this man to do a full-fledged Tiki bar! Mike, if you need any advice in terms of lighting, p.m. me. |
|
Z
ZuluMagoo
Posted
posted
on
Fri, Dec 29, 2006 4:05 PM
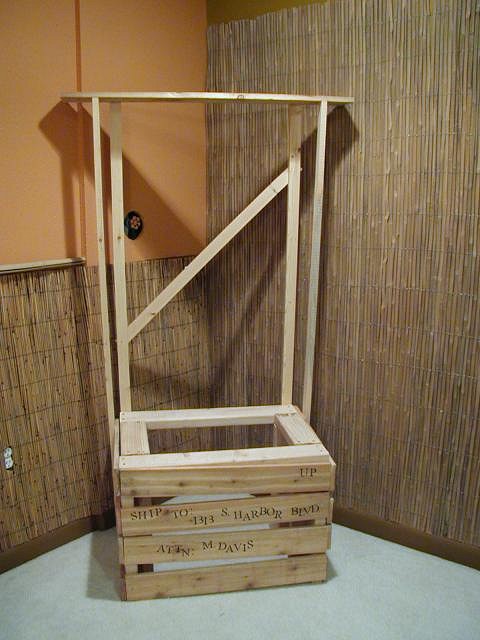
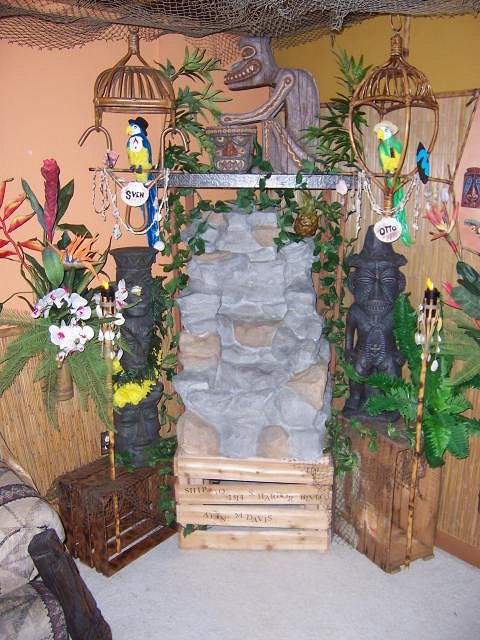
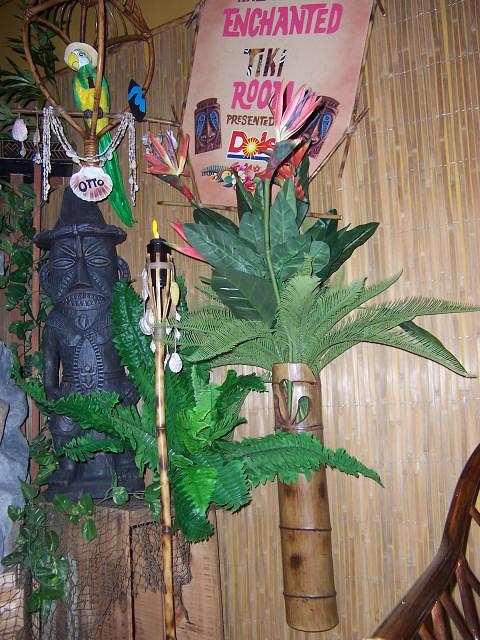
Round II of the 2006 Holiday Blizzard here in Denver has given me some more free time around the house, so I figured I'd put it to good use with a another update. Big bro - I haven't even touched the lighting yet, it will be one of the last things I work on. For now I want the full light while I work on these projects. I know Humuhumu has made the comments before that lighting and music will make or break your bar and I completely agree. Disneyland's Enchanted Tiki Room Display I decided to dedicate a corner of my space as a tribute to Walt Disney's Enchanted Tiki Room at Disneyland. As you have seen, I created my two birds several months ago, but I wanted some way to display them along with the drummer big fig I purchased from Disney. So I built a frame from 2x4s and screwed on some wooden fence planks to make the base look like a shipping crate. I also built a shelf over the top for the drummer and attached it to the wall for additional support. I didn't want that expensive drummer fig to fall off.
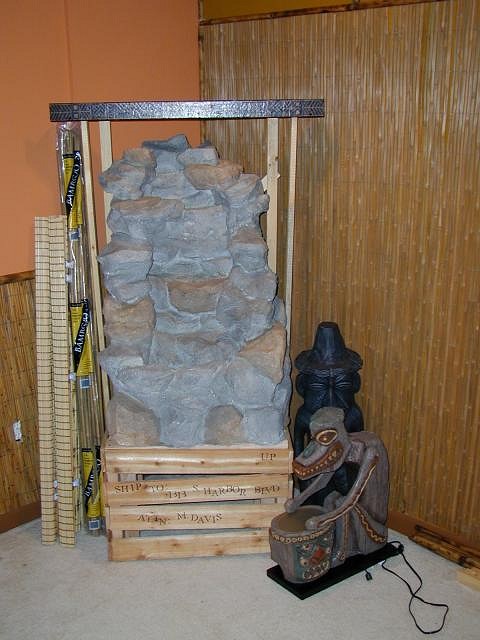
I wanted a water feature in my bar, so I purchased this self contained resin waterfall from Target earlier this summer. It was a little pricey. A rock waterfall on top of a wooden shipping crate does not make a lot of sense, but it works for me. Then I started putting the parts together.
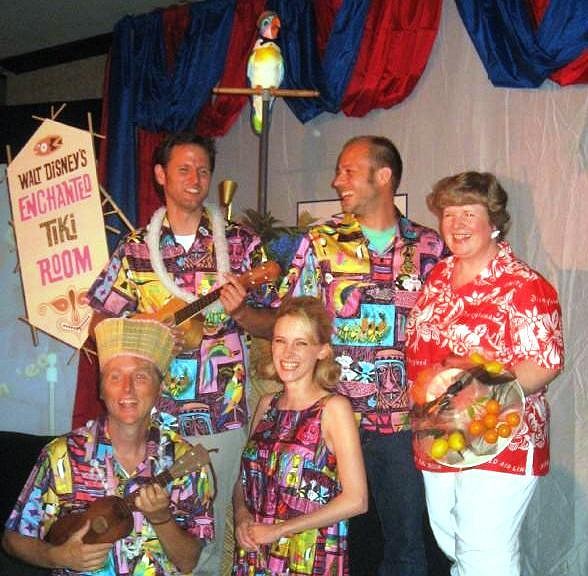
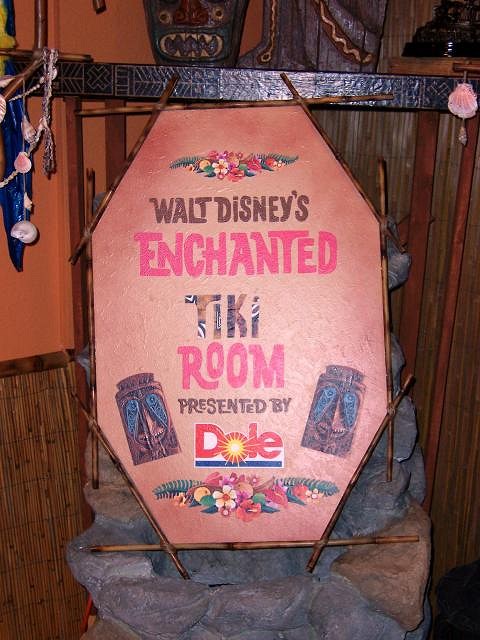
I remembered a post that Humuhumu made a while back about a tiki room presentation that Kevin, Jody, KK, Humu and Stacia made at the NFFC, so I dug up a picture. I specifically remembered the tiki room sign that was created for the display. I really wanted one for my space, so of course decided to make one myself. I got some tan 1/4" foam board (hobby store) and spray painted around the edges to give it some color. I painted most of the text on the board. The word 'tiki' was cut from a color xerox page of a vintage aloha shirt pattern. The flowers are enlarged color copies from a Mai Kai drink menu, the 'Dole' is a color print out of the logo I found on-line, and the tikis are color copies from an older Disneyland guide book. I try to make these projects as easy as possible but still look good. I didn't want to paint any of that stuff, so I just decoupaged all of it onto the sign after I finished painted the text. Hot glue some bamboo border and it is ready to go. I will hang it on the wall next to the display after I finish a few more projects. Last thing I have to do is add the greenery to the display. I have Birds of Paradise, orchids, etc.. to finish it off. |
|
M

Matterhorn1959
Posted
posted
on
Fri, Dec 29, 2006 7:18 PM
Looking Good! I like the inside M. Davis joke on the crate! |
|
Z
ZuluMagoo
Posted
posted
on
Fri, Jan 12, 2007 9:58 AM
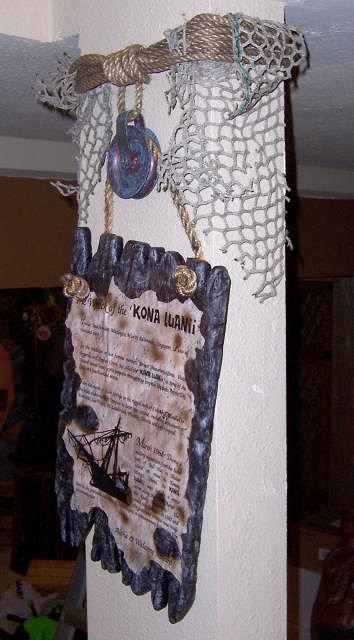
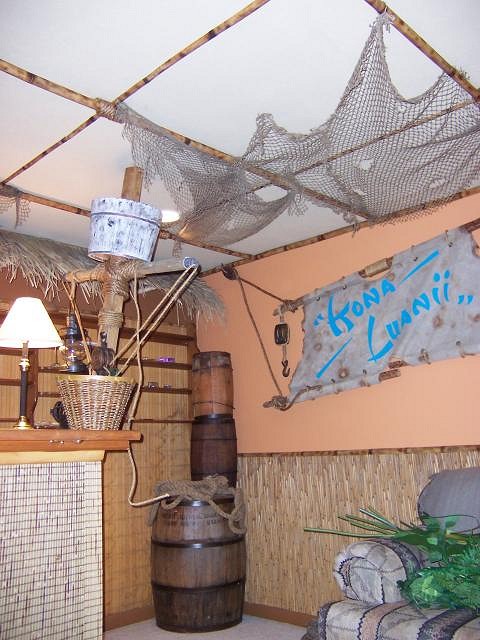
I finished the sign with the back story for the bar (mentioned on the first page of this post) and it hangs at the bottom of the stairs at the entrance into the bar.
Ceiling treatments:
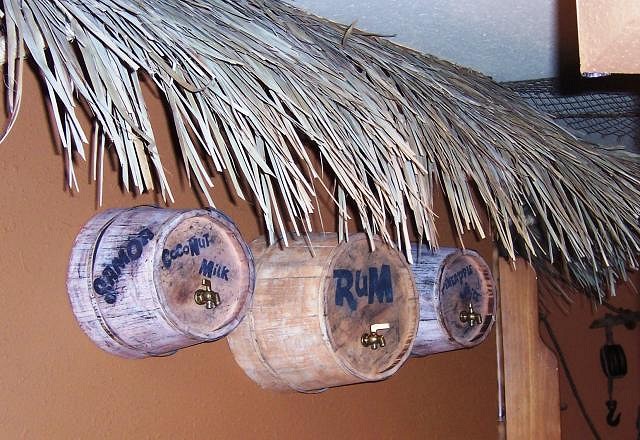
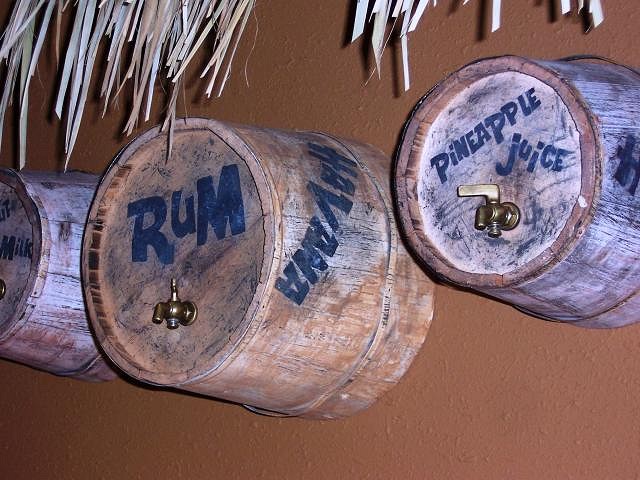
On the back wall behind the bar I made some rum kegs to hang on the wall (decor only). After I had finished, my wife pointed out the kegs were the main ingredients for a pina colada (coconut milk, pineapple juice and rum). A pina colada is a tropical drink, but not necessarily a tiki drink. I hadn't thought about it while I was making them, but oh well, they still look good on the wall.
|
|
SF
Slacks Ferret
Posted
posted
on
Tue, Jan 16, 2007 7:15 PM
You've done so much since I last looked. It's really coming together well! Nice work. P.S. I love your idea on how to make rigging from the wooden plaques/platforms. I was wondering how to make those from scratch and I took dozens of photos of 'em last time I was at Oceanic Arts. But now, I'm stealing your idea. It's easier and effective. Thanks! |
|
S

ShawnJuanTiki
Posted
posted
on
Wed, Jan 24, 2007 9:46 PM
Absolutely stunning! I came here for some ideas for a screened room tiki environment to relax in after a long day and stumbled upon this masterpiece. Talk about creativity.......... I aspire to put together something 1/2 as good. Keep up the good work. I need all the help and ideas I can get! |
|
P

pappythesailor
Posted
posted
on
Thu, Jan 25, 2007 2:04 AM
Great work. I don't know how I missed this thread until today. I look forward to more updates! |
|
G

GatorRob
Posted
posted
on
Thu, Jan 25, 2007 4:09 PM
Looks terrific! If I could offer just a hint of constructive criticism, you might consider painting the ceiling darker before you get it too covered. The ceiling drywall really needs to disappear when the lights go down. But, even without that, I'm so inspired by your creativeness! It's going to look terrific. |
|
Z
ZuluMagoo
Posted
posted
on
Tue, Feb 6, 2007 8:33 PM
I had been debating for months about going back and darkening the ceiling again. I had already painted it once (2 coats) and really didn't want to do it again. But I wasn't ever really happy with it. GatorRob's suggestion kicked me in the pants to go back and fix it before I get any further along with the project. So last weekend I put up the first primer coat of the darker color. It already looks MUCH better. Thanks GR!
While I was working on the ceiling last Sunday, my 4 year old in her infinite wisdom asks me why I was painting the ceiling again, why didn't I just do it right the first time? I should have listened. Note to self: It is much easier to paint without other shit on the walls getting in your way, pick the correct color the first time! [ Edited by: ZuluMagoo 2007-02-07 06:18 ] |
|
G
GatorRob
Posted
posted
on
Sun, Feb 25, 2007 10:23 AM
Ha! Sorry to be the cause of so much extra work. But I think when you're done you're going to be that much happier with the results. Keep us posted... |
|
MR
Matt Reese
Posted
posted
on
Tue, Feb 27, 2007 8:32 AM
Great stuff! I'm really enjoying the progress pics. You're giving me a lot of ideas for enhancing my place. You've got resource-fullness going for you for sure. I love seeing that level of creativity and attention to detail. Probably one of the coolest home bars posted on TC. Keep it coming! |
|
H

hewey
Posted
posted
on
Tue, Feb 27, 2007 6:24 PM
Awesome work man! That sail really blows me away - so cheap yet so effective! :) |
|
B

Bogielocks
Posted
posted
on
Fri, Mar 9, 2007 7:21 PM
Wow. I mean Wow! |
|
T

tikiskip
Posted
posted
on
Fri, Mar 9, 2007 9:04 PM
Lookin good! You have a lot of great ideas. |
|
H

Helz
Posted
posted
on
Sun, Mar 11, 2007 9:21 PM
Zulu.... FANTASTIC work man! This place looks amazing! |
|
Z
ZuluMagoo
Posted
posted
on
Sun, Mar 25, 2007 10:04 AM
The ceiling rework is finish. It was a major pain in the ass, but it looks much better now.
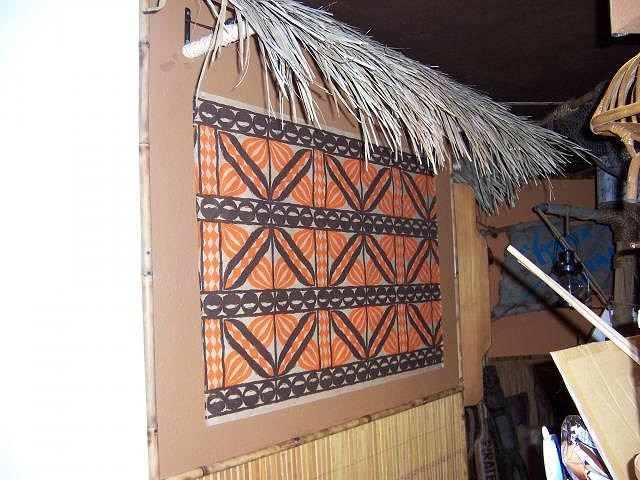
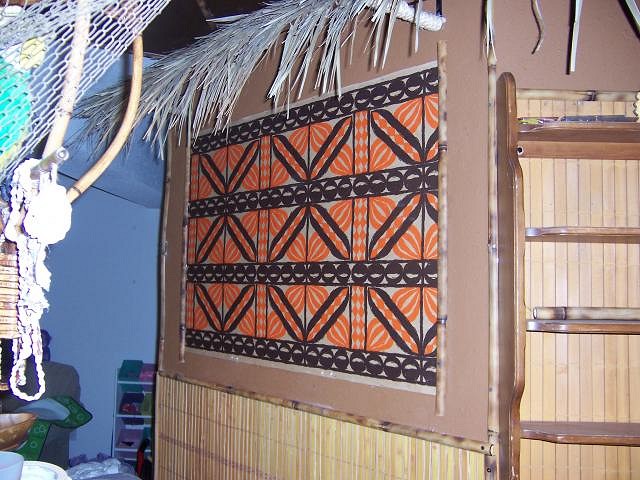
I have this fantastic tapa pattern paper that I have been wanting to use, so I choose to mount it on the wall as a panel. I took the rum barrels off the wall behind the bar so I could use the whole back wall. I cut the sheet to size and stapled it to the wall along the edges. It is a heavy paper and I was worried about ripping and staining (splashes, etc.) so I painted three coats of clear decuopage to seal it. When it dried, it shrank a little so it removed all of the wrinkles and was hard to the touch. It worked great. Then I trimmed out the panel along each side with bamboo (it also covered the staples). To complete, I will lash rope at the corners of the bamboo. |
|
Z
ZuluMagoo
Posted
posted
on
Sun, Mar 25, 2007 10:27 AM
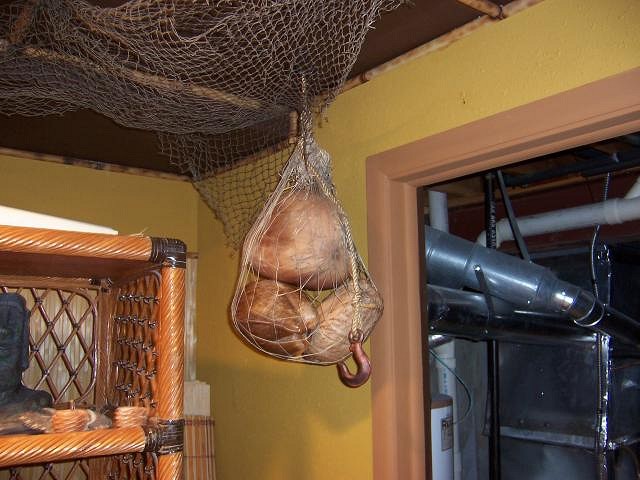
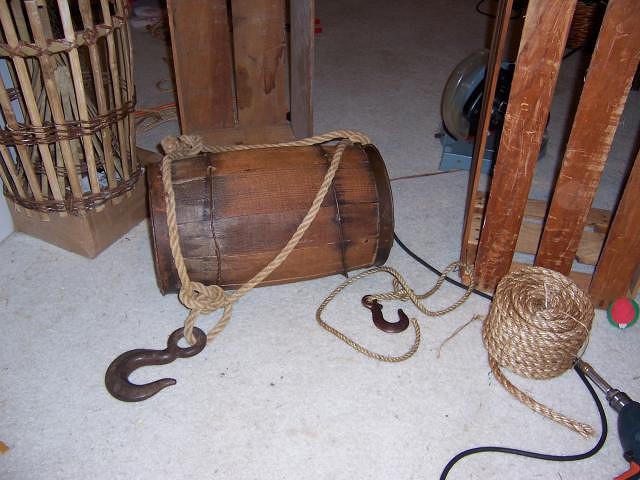
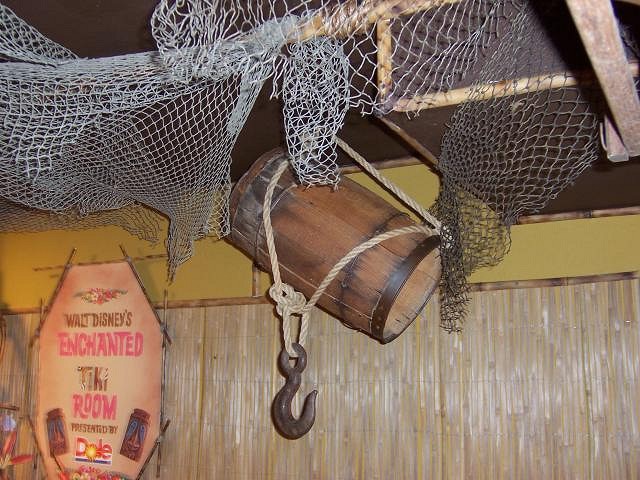
I stumbled across these coconuts at an estate sale last week for three bucks each. The gal running the sale questioned me when I brought a bag of coconuts up to her when checking out. She told me almost threw them out when setting up the sale, but said she was never surprised at the stuff people will buy. I also got the hook out of the garage for a quarter. I have also making 'salvaged cargo' to hang from the ceiling.
|
|
Z
ZuluMagoo
Posted
posted
on
Sun, Mar 25, 2007 10:32 AM
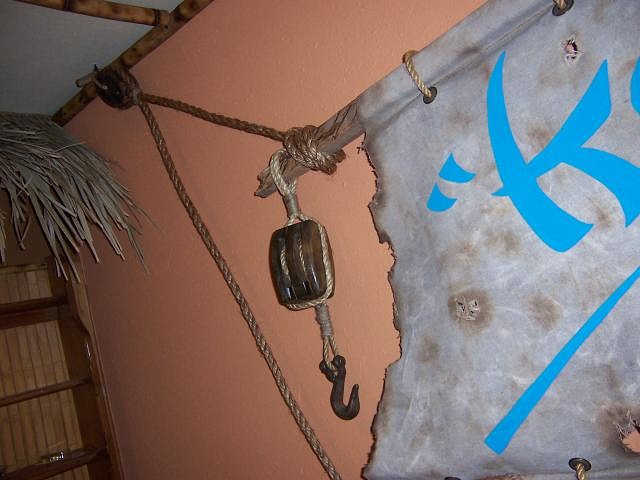
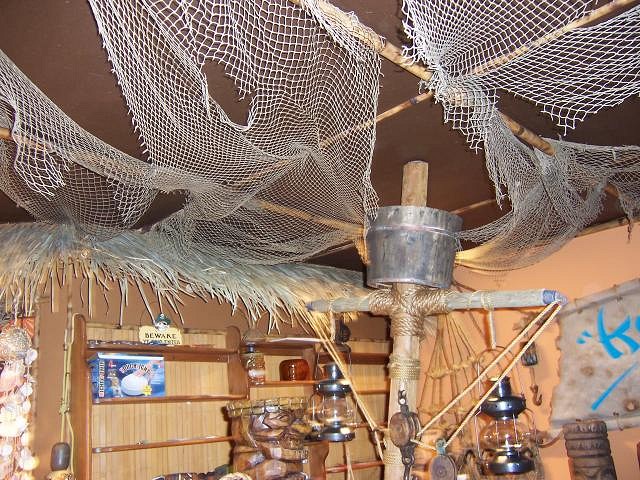
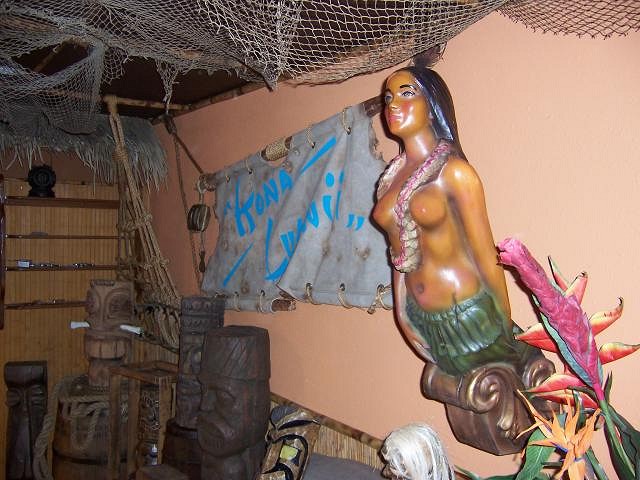
Sticking with the shipwreck/nautical portion of the theme, I mounted some rigging and a mast head.
|
|
B
bigbrotiki
Posted
posted
on
Sun, Mar 25, 2007 11:33 AM
Wonderful! I always wanted to use one of those Wahine figureheads! My home town of Hamburg has a bunch of stores around the port with that kind of nautical kitsch, I grew up around the sailor bar fishing net aesthetic. I can hear the soundtrack for the Kona Luanii now: ...can't wait to see the place with more atmospheric than flash lighting! |
|
Z
ZuluMagoo
Posted
posted
on
Sun, Mar 25, 2007 8:59 PM
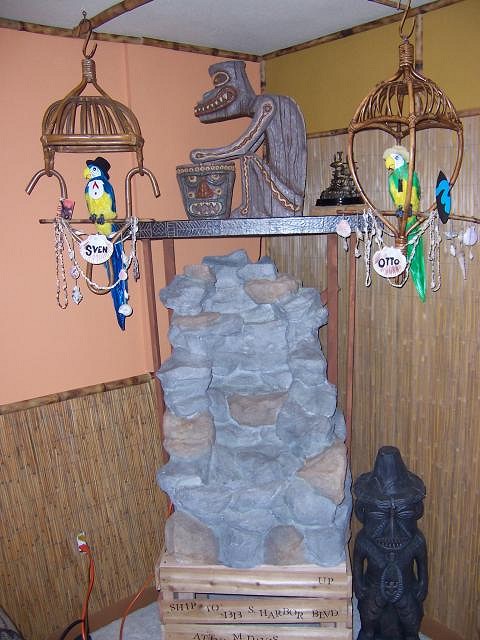
The waterfall (Disney's Enchanted Tiki Room tribute corner) is finished.
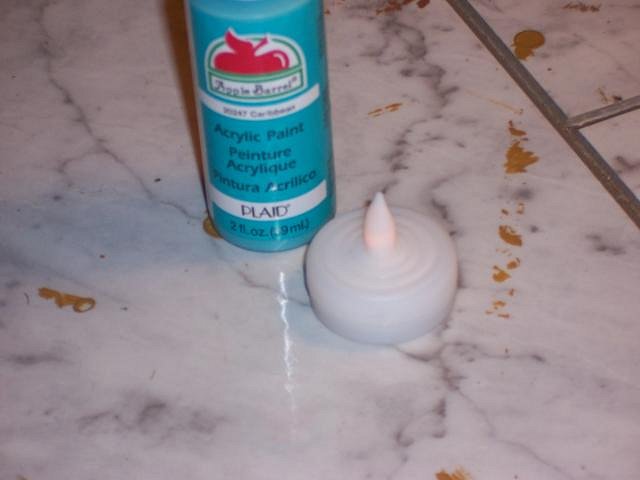
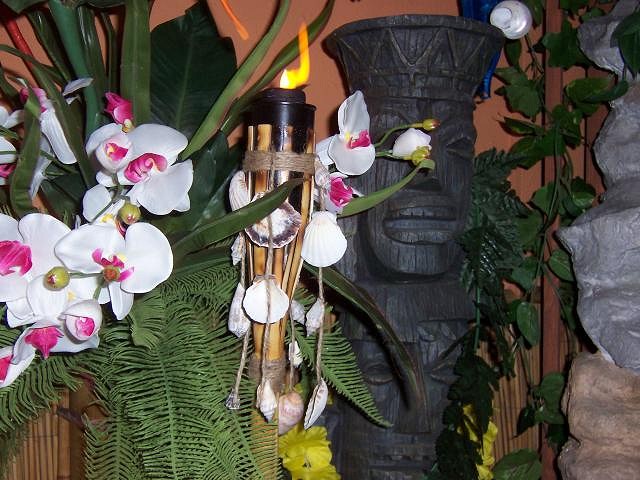
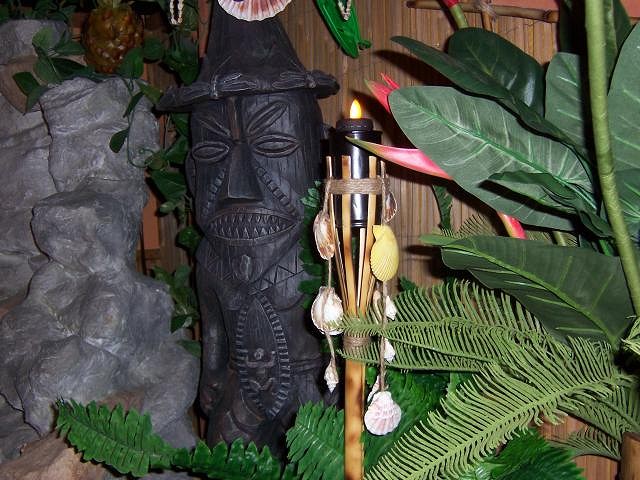
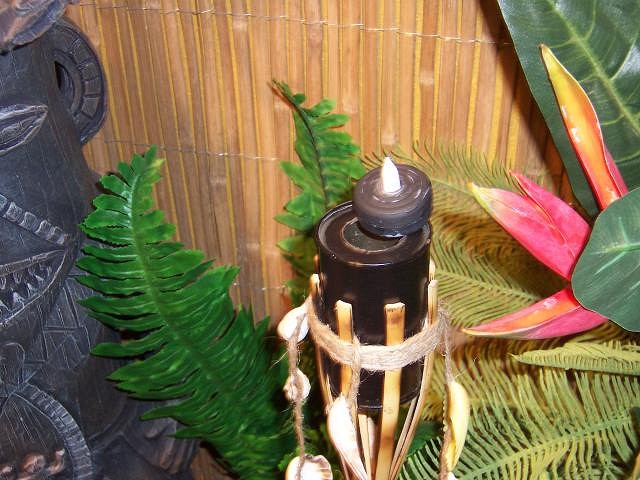
I added a few generic everyday tiki torches to the display, but altered them slightly to look better. My friend the handheld blow torch did a wonderful job of distressing the poles. I used my Dremel with a cutting wheel to cut off the wick screw on top of the canister. Then I painted the bottom of a ficker candle black and just set it on top of the canister. With the lights dimmed down, it is a very realistic effect and looks great. Then I finished off with a few lengths of twine glued with seashells.
Making progress, lots more to do. Atmospheric pics sans camera flash to follow after I have finished the lighting of the bar. |
|
G
GatorRob
Posted
posted
on
Tue, Mar 27, 2007 1:04 PM
Yeah!! Now you're talkin! Looks great. Maybe you should go with black though? (kidding, kidding) |
|
D

differnt
Posted
posted
on
Tue, May 8, 2007 4:07 PM
As luck would have it, I found your post while looking for pirate themed decor for my 2 year old son. I was trying to discover how to make a realistic looking sail (thus make his bed look like a pirate ship). I found so many great ideas here. I had gotten material from Walmart for $1 per yard, so will distress the material with ink. I love the part on the bar with the bucket for a lookout. The sign idea will work great for a pirate wanted sign I have. It was made using my son's picture. Thanks again & I plan to check back often for more ideas & inspiration. I will try to post pictures when it is all done for anyone who might be interested. |
|
BK

Big Kahuna
Posted
posted
on
Tue, May 15, 2007 8:34 PM
Holy Toledo! I think we've found Martha Stewart's illegitimate son. You know, the one with the "Tiki Problem"! Maybe we should stage an intervention! |